User Manual
This is TIMEOFF.GURU's user manual for version 10.4.
Introduction
TIMEOFF.GURU is an online system to manage leave of absence requests and handle the overall process of leave management while completely avoiding the use of paper. The system supports all current browsers and smart phones. To access the platform, the admin of your organization has to send you an invitation. Please contact your administrator if you are having trouble with the access to the system.
There are two ways to enjoy TIMEOFF.GURU - through a web browser or via a mobile app.
Using TIMEOFF.GURU with Web Browser
You will receive special invitation in your mail box to access TIMEOFF.GURU. You cannot enter the system without an invitation.
Accepting access invitation
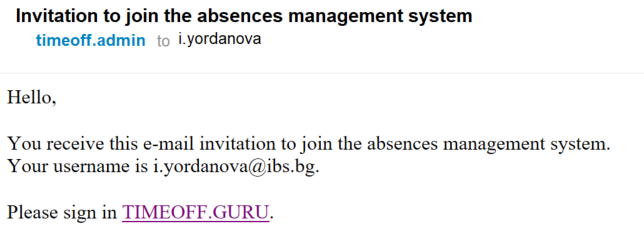
Invitations are sent by an administrator of the platform to your email address. The email address is also used to login later in the system. After you receive the invitation, follow the link to verify your account and enter your personal password. Note that this password is only known to you. It is stored in the system in hash (one-way encryption) format. In case you forget, there is a "Forgot password" link in the login page.
The Calendar
After you log in TIMEOFF.GURU you are presented with the welcome wizard, which will guide you through the main components of the UI. Follow the steps to get acquainted with the main screen of the system - the Calendar. It includes information about your and your teams' absences. You can always invoke the welcome wizard by clicking on the question mark ![]() next to your name to review again the main options in the calendar view.
next to your name to review again the main options in the calendar view.
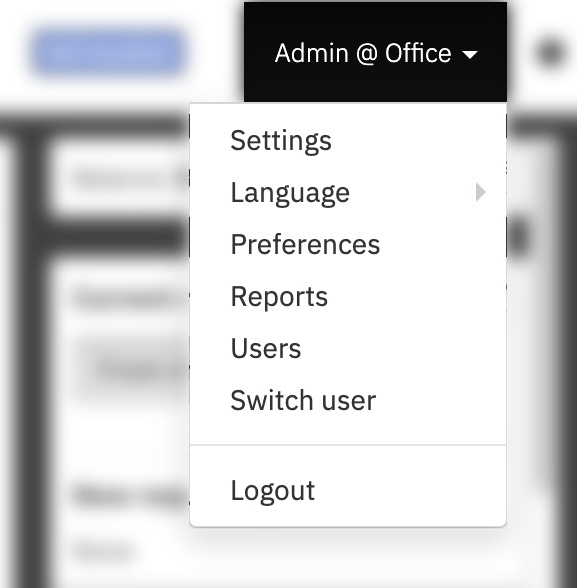 Your name appears on the top right side, revealing a drop-down menu with several options:
- Language - your system might be configured to work with additional languages. Check to see if you can work with your preferred one.
- Preferences - for setting up your personal preferences in the system
- Logout
Users with manager privileges see additional options such as "Switch user ...", "Reports".
- Switch user - to work in the system on behalf of another user
- Users - for user management
- Settings - configuration and customization of the platform
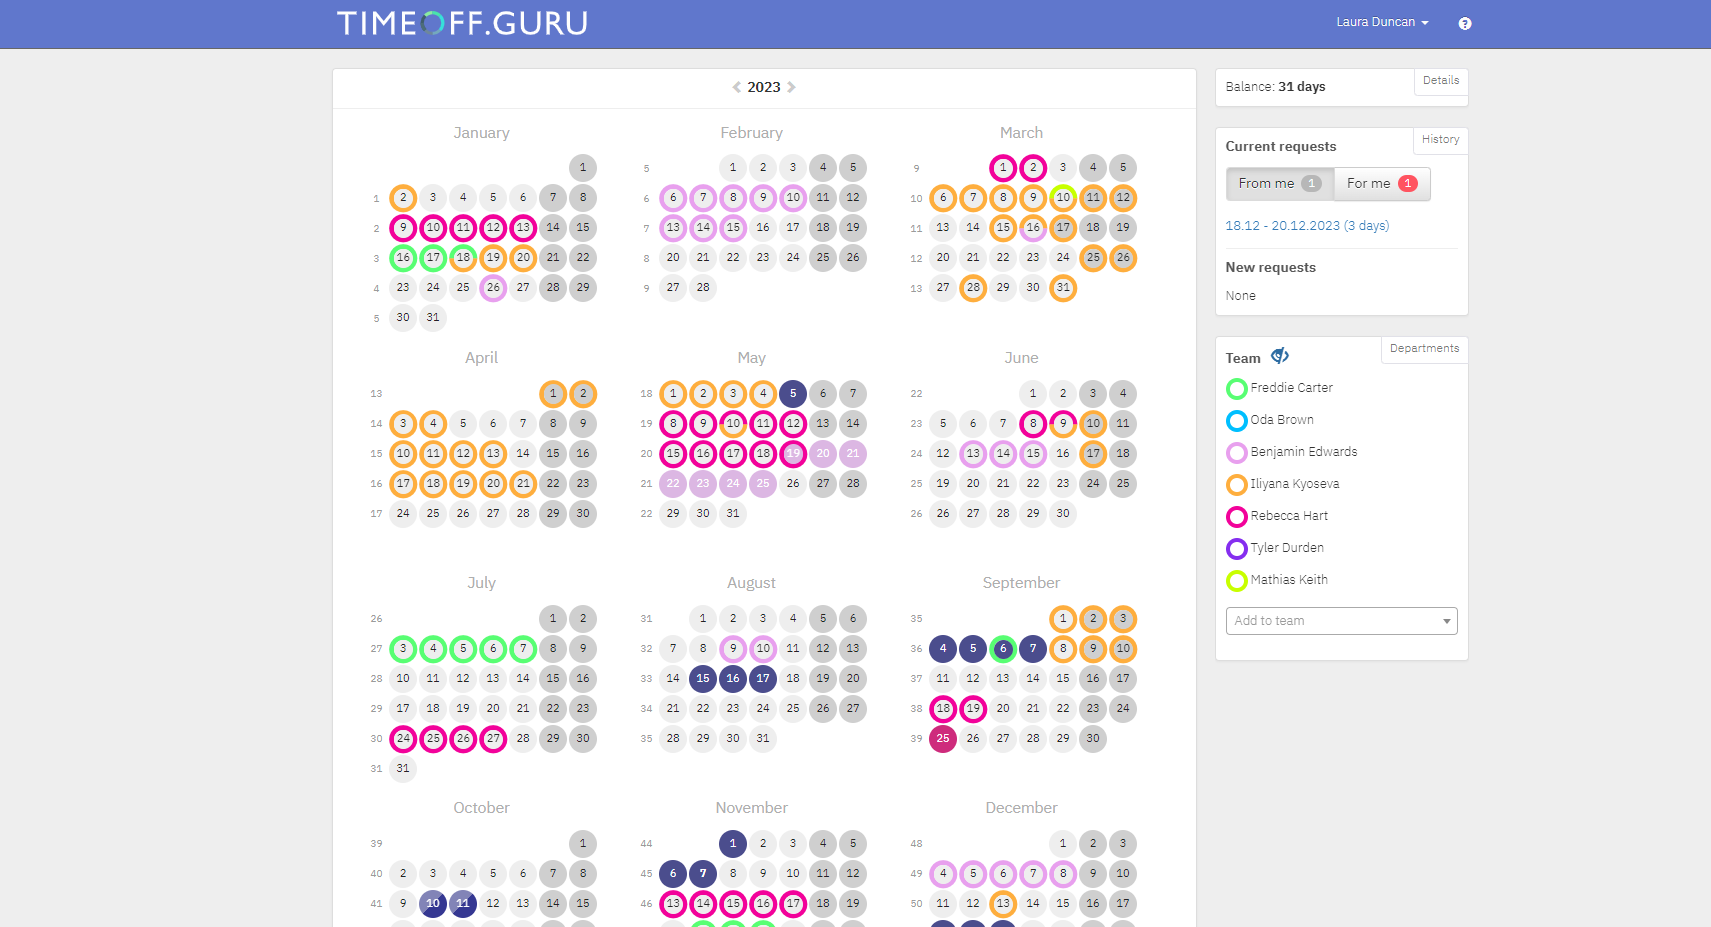
The annual calendar can be used not only to make a request, but also to promptly check current year’s holidays and working days. It provides an overview of your leaves and on the leaves of your team in the current year. By clicking on the arrows on both sides of the current year, you can switch between past and future years. The calendar days, which are completely filled in a dark blue colour are your absence requests. Dates, which are filled with pink are usually your sick leaves, if you have any. All other days, marked by color in the edges of the circle, are days when your colleagues have been/are/will be absent. Each color corresponds to a different person from the team. By hovering the mouse on the day when someone on your team is on leave you will be able to see their name, the type of leave, and who is the substitute. Under the calendar, to the right, there is a legend about the different types of with their assigned colour.
 On the right side of the calendar there are several menus that give information about your requests.
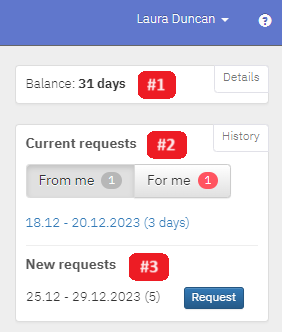
- Balance - The remaining paid leave days and hours which you have. The Details link (located to the right of the “Balance days” option) provides detailed information on all types of leaves throughout the years.
- Current requests - In this section are shown all leave requests „From me” and "For me". These requests are waiting for approval / rejection but have not been used yet. By clicking on the “From me” option in History, you can browse through a detailed breakdown of your requests. When reviewing the history of your requests, which you have submitted or received for approval/ rejection, you can see detailed information regarding each request such as: the period, the type of absence, the substitute (if there is one), date of submission and who approved it. There are also options to print the request and attach a file to it.
- New request - It shows all current requests you have selected in the calendar but have not submitted for approval request.
Working with Your Team
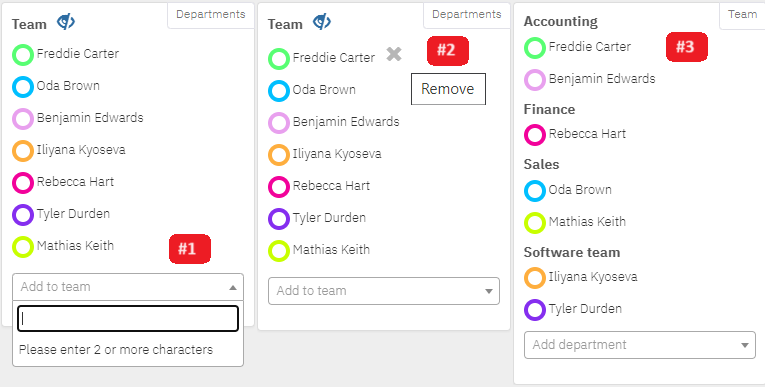
In this panel you can add colleagues from your or from another team, in order to be informed when they will be absent. Each member of your team is highlighted with a specific color in order to be distinguished from the others in the calendar. You can add, remove, change associated color, enable and disable employee from your team.
- Add team member - Adding can be done by entering a name in the "Add to Team" field. Then "TIMEOFF.GURU" will offer you a list from which to select an employee.
- Remove - Next to each name there is an "x" sign. Click it to remove specific team member.
- View by Departments - By clicking on the "Departments" button you can view the team members grouped by department and you can also add or remove entire departments from your organization.
You can also:
- Change colors - Each team member appears in a different color. By clicking on a specific circle, you can set an individual color of your choice.
- See your vacations only - The button
 on the right, above the names, allows you to hide all the leaves of your team, leaving you to see only yours.
- See specific team member's absences - By clicking on the names you can show and hide the information in the calendar.
Making a request for leave of absence
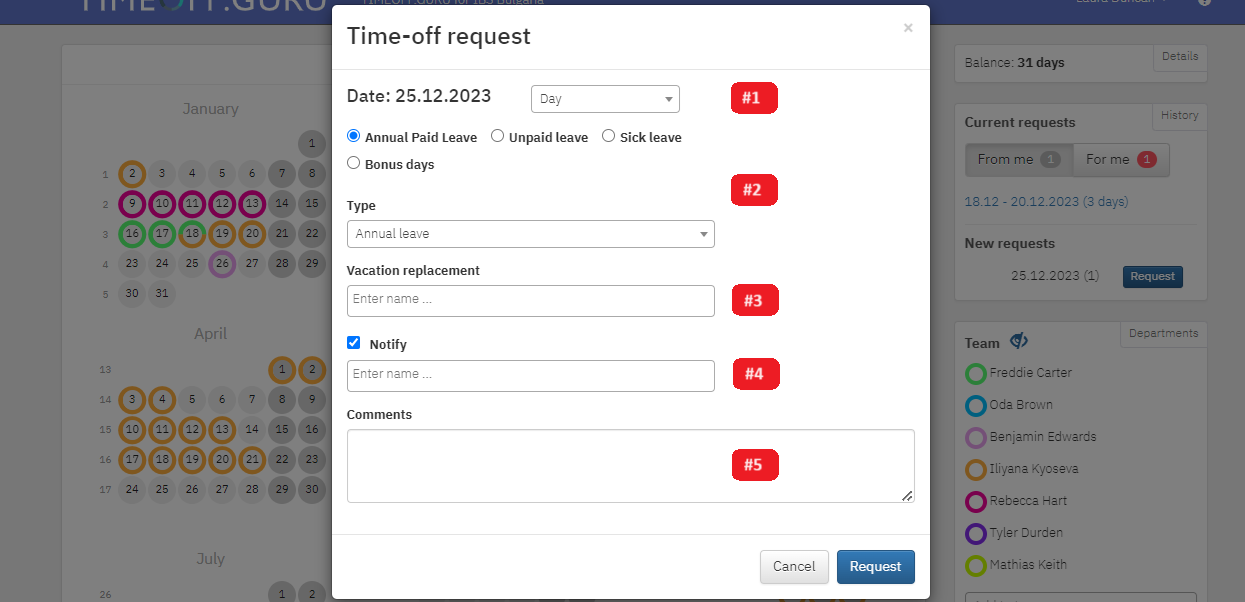
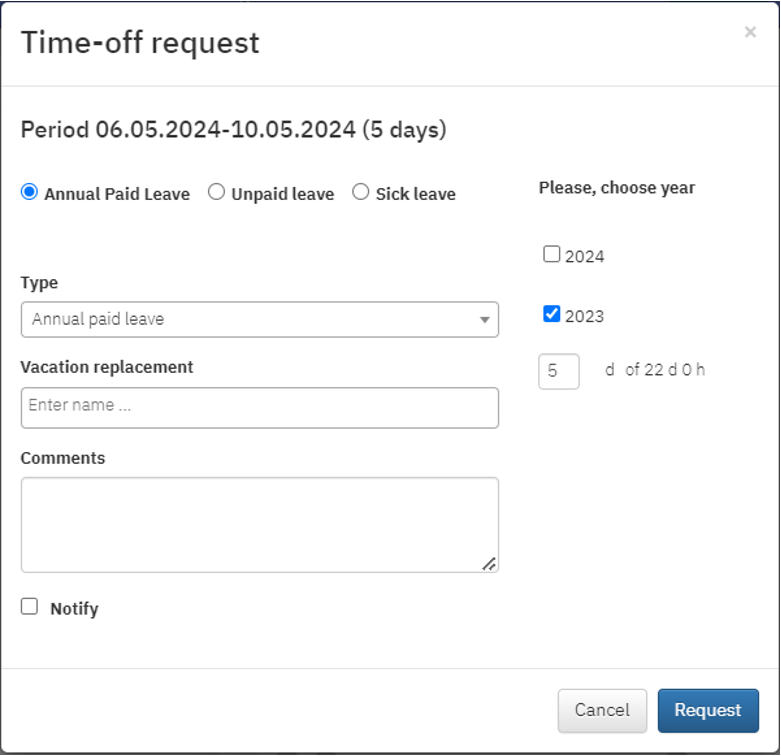
Requesting a leave of absence is made as easy as possible. Just click desired date range from the calendar. You can also click and drag the mouse over several dates. The selection is marked in blue. The period is also reflected in the "New Requests" section on the right, including the number of days you are about to request. To complete your request, click the "Request" button. In the window that will appear, you will see:
- Period – If you have selected just 1 day you can also specify if your absence will be for half day (before or after noon) or a specific period of time.
- Leave Category & Type - Paid, Unpaid, Sick leave or Compensation. Some of the options may vary depending on your system's setting. Based on the selected leave category, 1 or more types of leave will be made available. The list again may vary depending on the setting;
- Vacation replacement - the person who will substitute you while you are on vacation;
- Notify - Specify up to 5 colleagues to be notified that you are on leave. The option is active after the check box that appears at the front is marked;
- Comments - Optional field where you can add more information about the request;
After entering the information, please click on "Request" button. You should see confirmation window popping up.
After you submit your request the system will automatically deduct from your leave balance. Then, in the "Details" menu of the calendar, you see how many days and hour you currently have and how many you have used in the past.
A video tutorial can be found HERE.
Checking the Status of Your Request
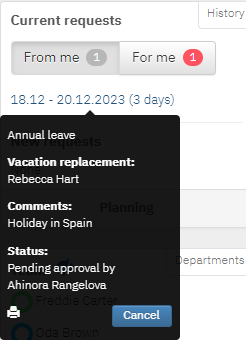
The toggle button "From me" in the "Current requests" panel shows all current requests that you have submitted. Click on a specific request to see information about the status of the request and who is next in line to approve it. If the leave is rejected, you will be able to see the person who rejected it and the rejection reason in "History" section. Request can be also printed, if this option is enabled in your system's settings.
You can always cancel your request, even if the period has already started. All days will be restored in your balance and all people, that have been part of the approval process will be notified.
Approving or Rejecting a Request
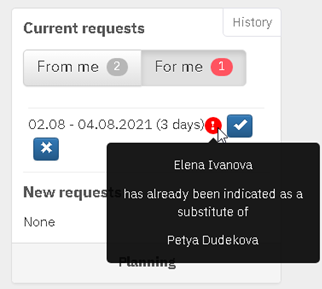
All pending requests waiting for your approval are in "For me" sections of the "Current Requests" panel. The menu shows the period and the number of days. You can approve requests by clicking on the button  and respectively reject leaves by clicking on the button
  . When rejecting a request, you must also enter the reason for that.
In the case of an employee that has requested leave and has indicated somebody as their substitute, if this person is already substituting for someone else, the system will indicate it.
Preferences
You can set up your own Preferences from the main menu, which you can access by clicking on your name on the top right corner of the screen.
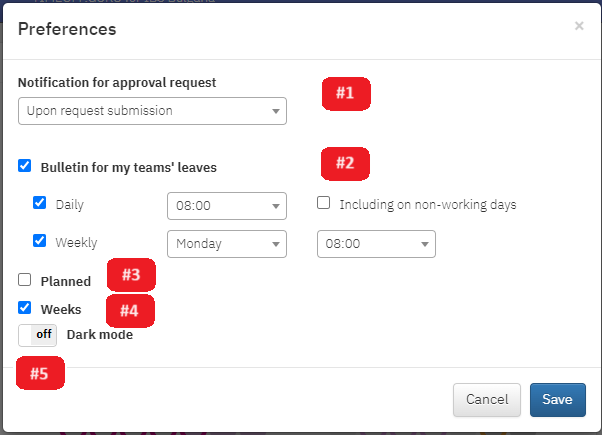
- Notification for approval request - If you receive too many vacation requests, you can group them and get a notification just once per day. Or you can leave the setting to "Upon request submittion" and get every request right away;
- Bulletin for my teams’ leaves - with this option you can set up a bulletin for absences of colleagues and receive email notifications on a daily and/or weekly basis;
- Planned - if you decide to enable this option, you will be able to see your planned absences in the main calendar. This function subject to your system's settings;
- Weeks - displays the number of the weeks in the calendar;
- Dark mode - switch between dark and light mode.
Other Functionalities
- Switch user - The option "Allow access on behalf of other user" in the system's settings can entitle managers to work on behalf of their subordinates. This is possible in cases where the employee is unable to access the system from their profile and to request leave. In this case, the Manager can work on behalf of his subordinate and make a request for leave.
- Print leave request - Printing a request from a user is possible if the option is activated in the system's general settings. The user will be able to print the requests for the "Current requests" panel and all past requests from the "History" menu. When the request period has not yet expired, printing is possible from "Current Requests" by clicking on the request, on the "Printer" icon displayed in the lower left corner. Printing past requests is possible from the "History" menu. After you select a specific request, its period, details about it and the stage of the approval process are displayed. To print the request, select the "Print" option.
- Attach file to a request - There is an option to attach a file to a request (if enabled in your system's settings). Attachment is possible for current requests and for past request. In the "Current Requests" panel, when clicked on a period, the document attachment icon is located in the bottom left corner next to the "Print" icon. After selecting the icon, a new window appears, where you need to select the file and attach it. Attaching a file for past request is possible from the "History" menu. By clicking on a specific request period full information about the absence is displayed. Under the request information you can selected "Attach file". After clicking on this button from the menu, select the file to attach.
Mobile Application
The mobile app of TIMEOFF.GURU provides the same easy to use interface to request and approve holiday requests. Available for iOS and Android and featuring functionality to:
- See info for your paid and unpaid leave balances
- Request absences from your calendar
- Review the absences of your team
- Review the status of absences you have requested
- Approve and reject requests
All the information in the mobile app is up to date, so no matter where you access TIMEOFF.GURU from, data is synchronized with the browser version.
Installing the Mobile App
You need to download and install the application for the operating system you are using on your mobile device.
![]()
![]()
Logging in the App
Depending on the access and security settings for your organization, entering TIMEOFF.GURU might be done in one of the following ways:
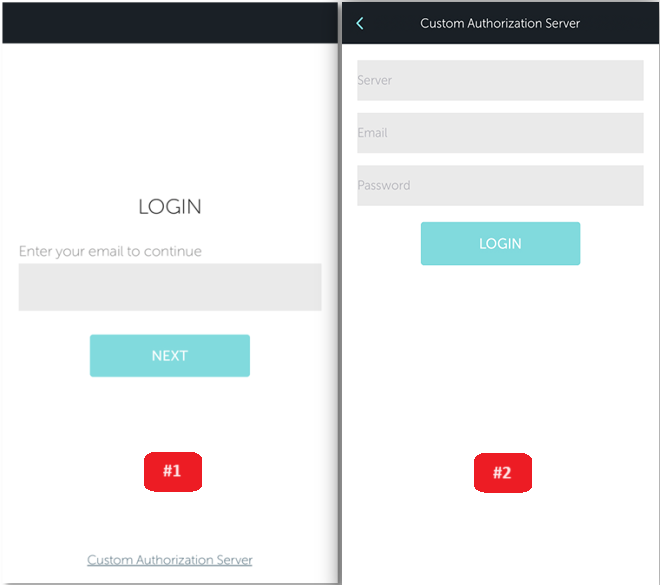
- Standard entry - On the initial screen, enter your business email address. Then go to "NEXT" to enter your password.
- Login via Directory Service Integration - If your organization is using MS Active Directory, Google Authentication, LDAP, SAML, OAUTH2 or some authentication other service, you should select the "Custom Authorization Server" link on the start screen. After that enter information about:
- Server – in this field you should enter the name of the authorization server;
- Email – enter your business email
- Password – enter your password
Information regarding the authorization server and further login details should be provided by your organization's TIMEOFF.GURU administrator.
Working with the App
After you log in, the following options are available in the mobile app:
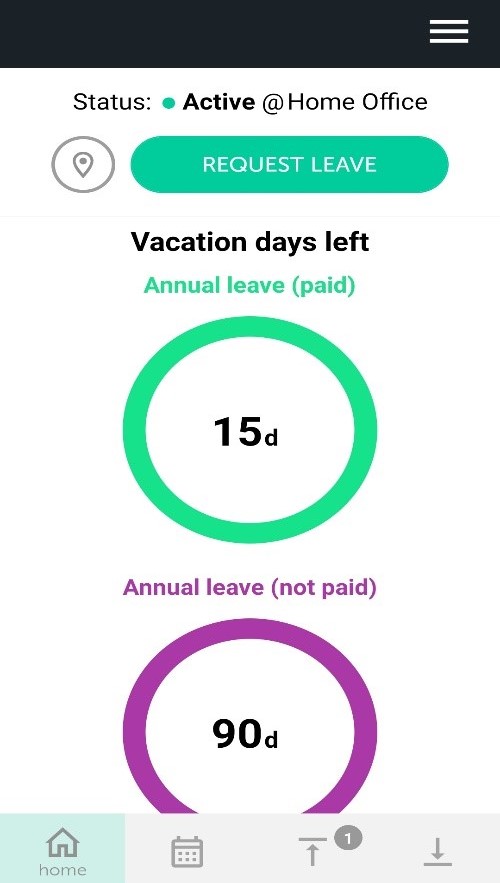
Home screen - provides general information about the remaining paid and unpaid leave days. You can create a holiday requests using the "Request leave" button. If you click on  , a new screen will pop up, where you can set up a new work location.
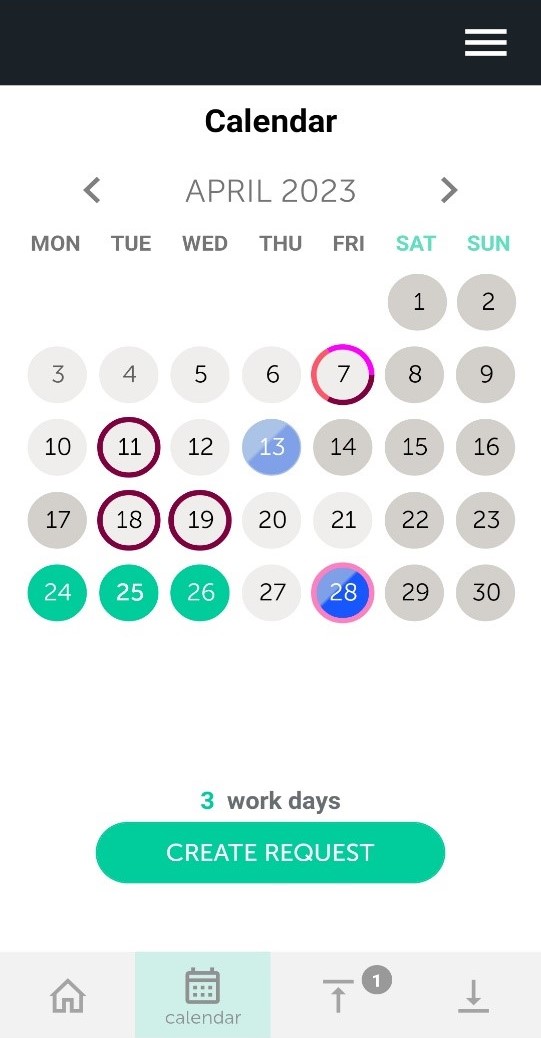
Calendar - shows calendar for the current month. Use the arrows next to the month and year to change the months back and forth. The days, filled with blue are all paid and unpaid leave requests that you have requested, pink-filled days are the days you were on sick leave. All other days, circled in color, are days when people in your team are on leave. You can see information about colleagues who are absent by holding on the day circled in color. You can mark the days for which you want to request a leave.
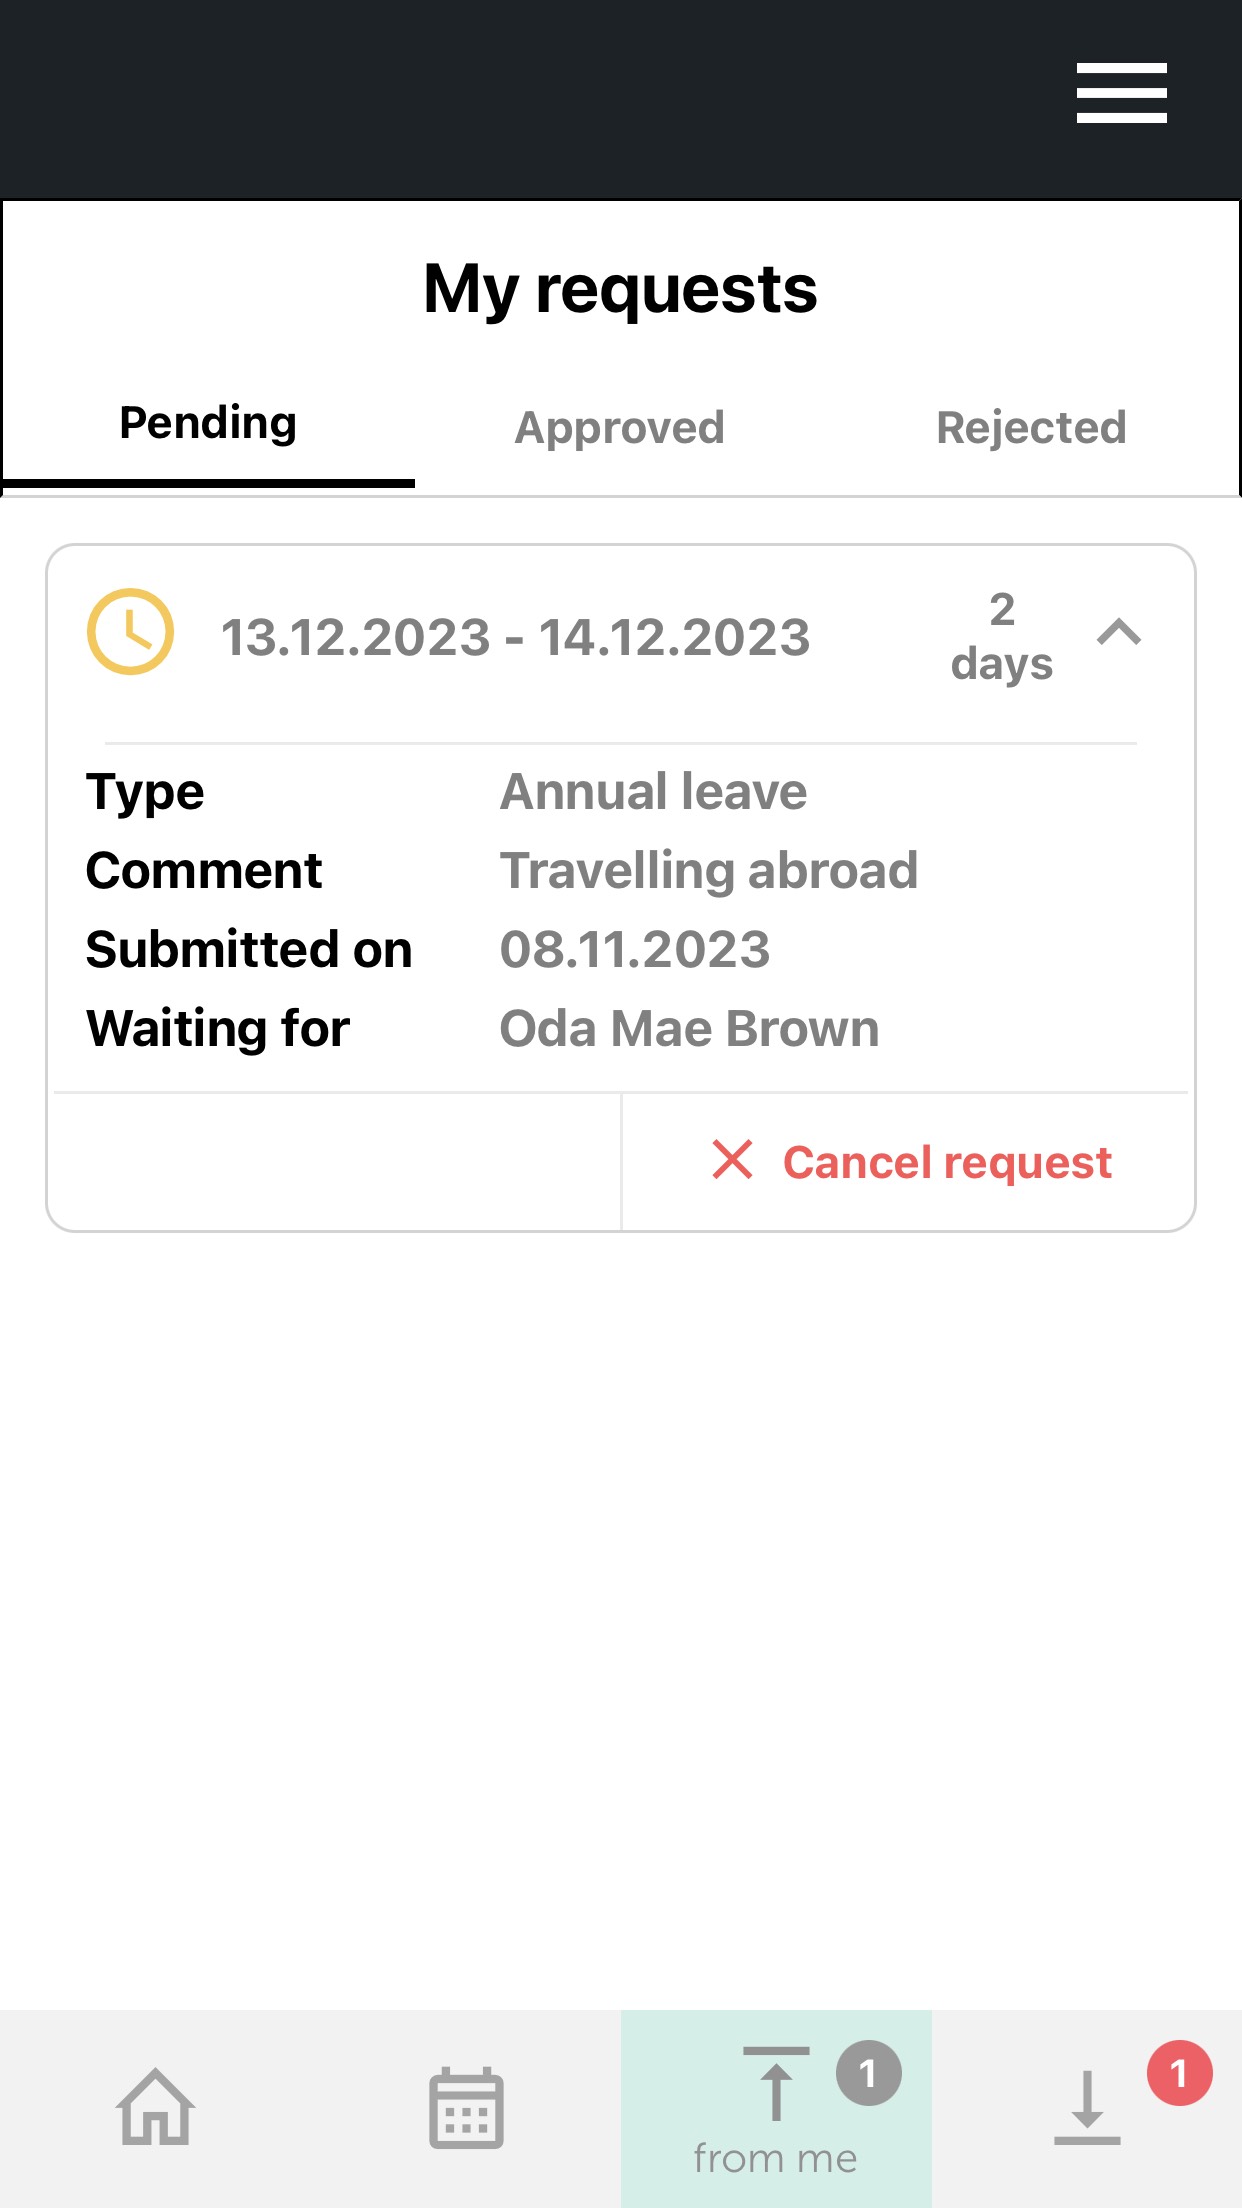
My requests - when you open "My Requests" screen from the link at the bottom of the screen, you can see your pending, approved, rejected requests and all the information about them. From here you can also cancel a current request.
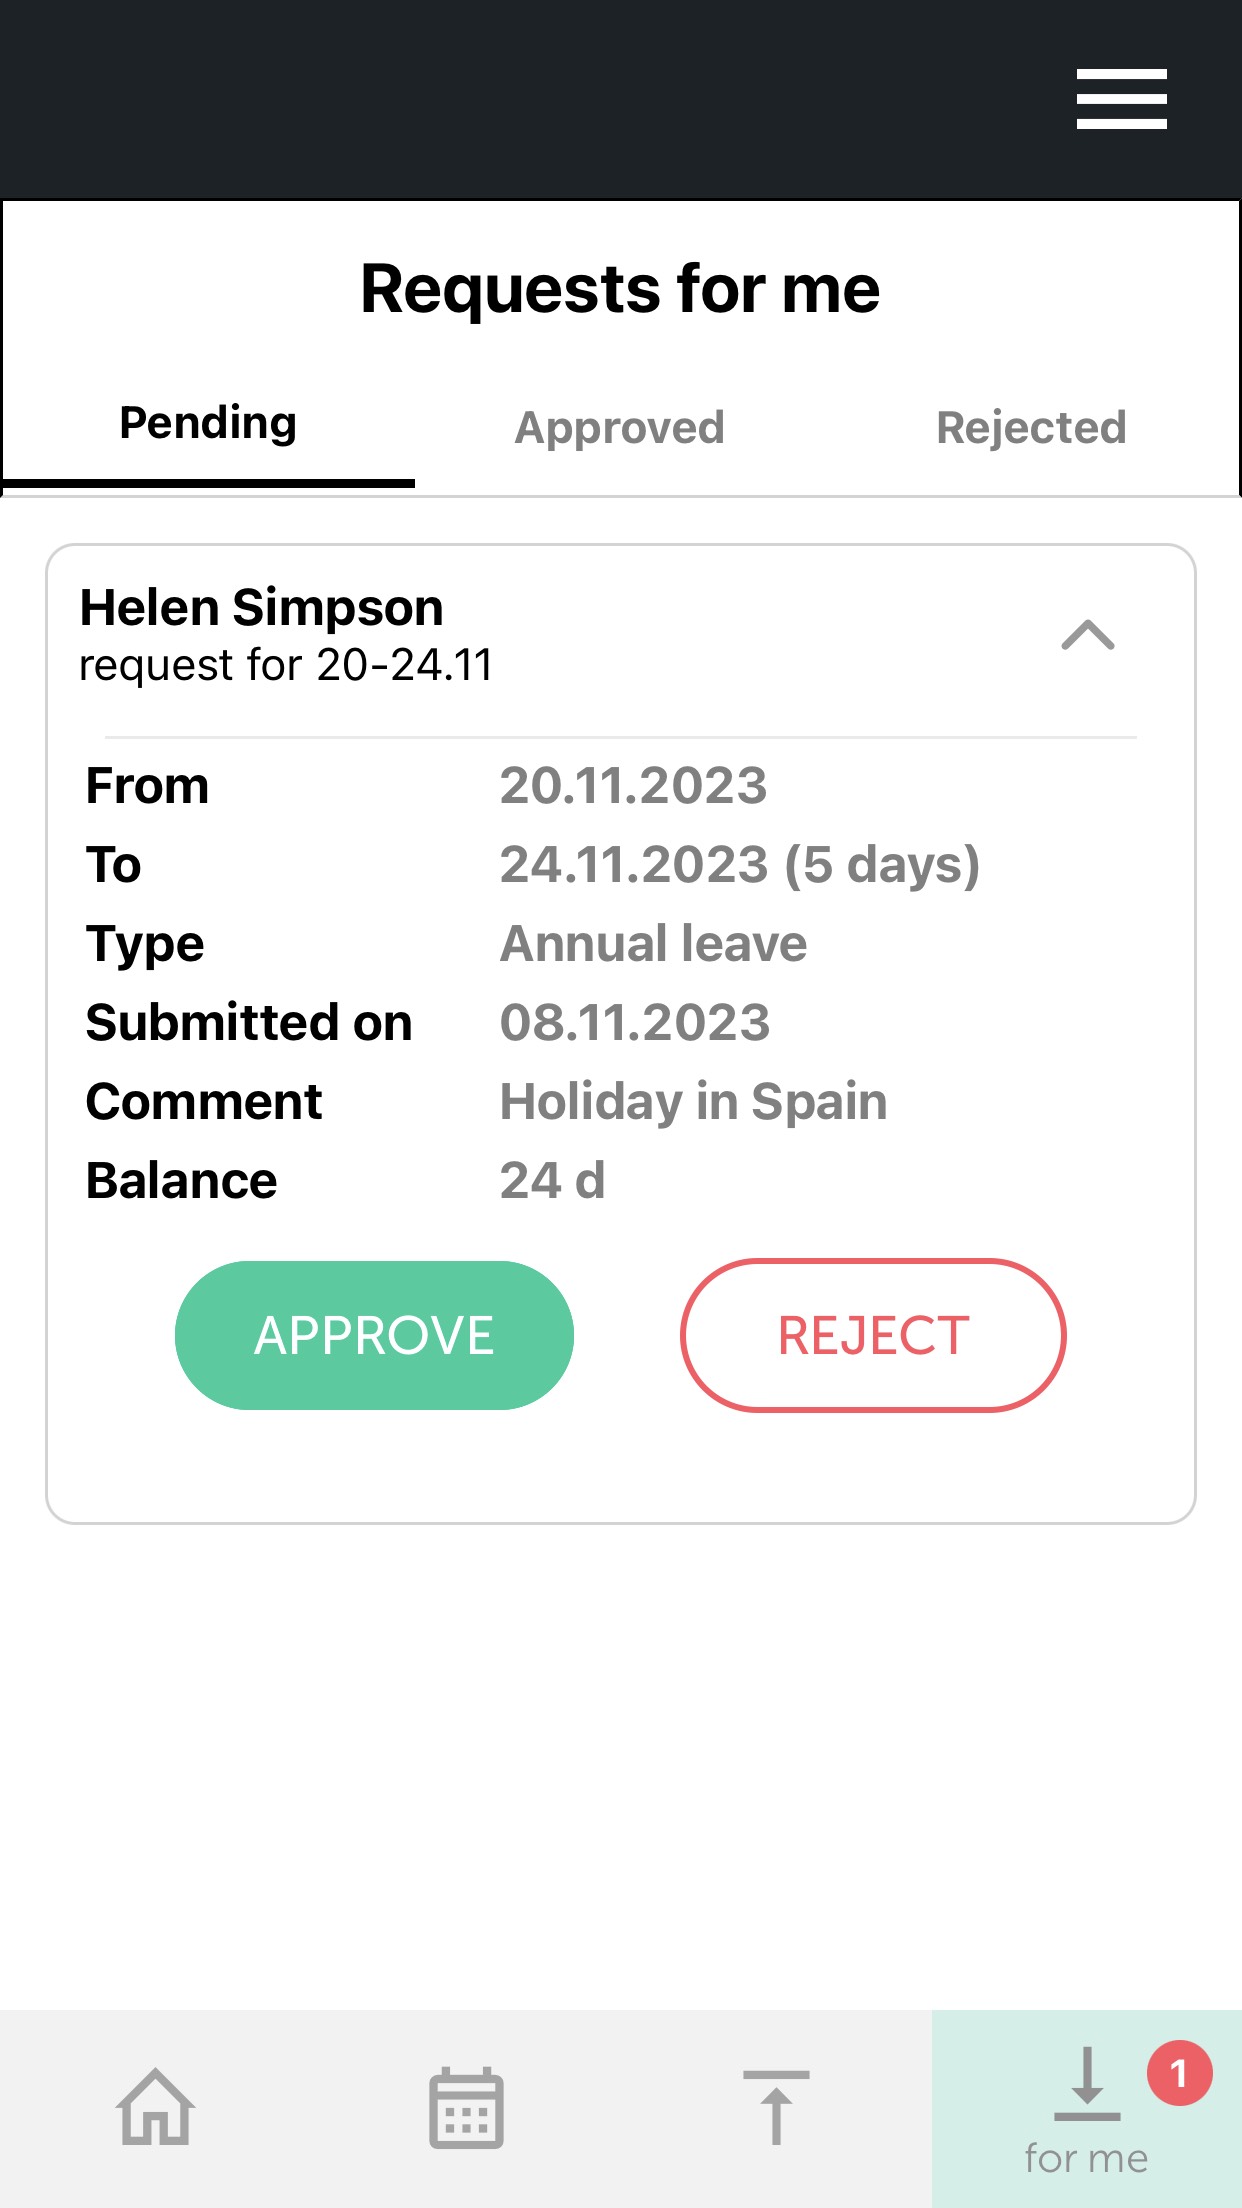
Requests for me - each request awaiting your approval is located in the "Requests to Me" page. Requests in the list that are awaiting approval from you, are expanded. You can see by whom it has been requested, the period, type of leave, and by whom it has been approved so far. You can approve or reject the request.

User menu - the "Settings" screen is reachable from  in the upper-right corner of the mobile app. Once the menu has been expanded, there are four submenus:
- My Account – it provides user information: names, email address, organization, and URL to the platform. From the menu, you can log out from your profile using the "Exit" button;
- My team – it provides information about the colleagues in your team;
- Language - choose your prefered language;
- About - provides information about the version of the mobile application.
Requesting a Leave
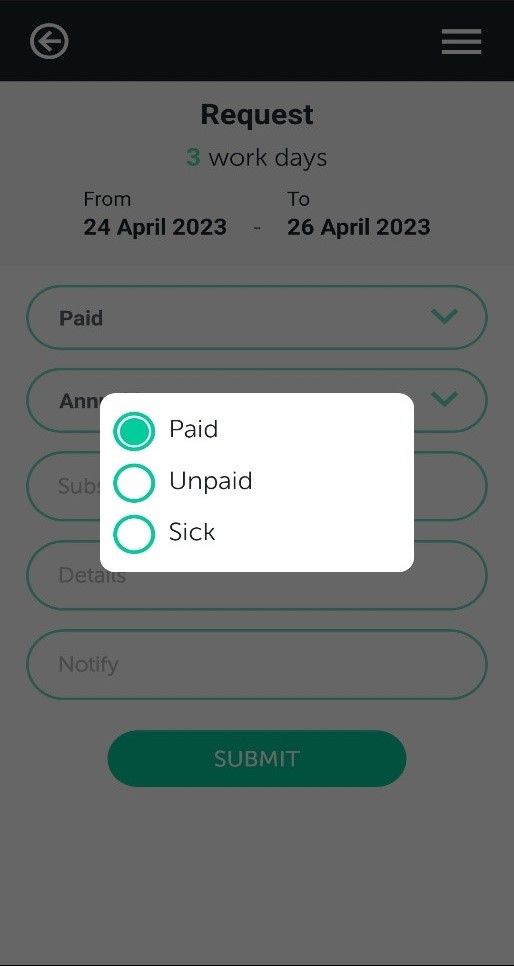
The request for leave is made from the Home screen with the "Request leave" button or from the Calendar screen by clicking on a specific date. For both options is necessary to mark the days you want to be absent from the calendar and then tap on the "Create request" button. A screen with information about the period you will be absent appears. Indicate the type of absence (paid, unpaid, illness leave, bonus days) as well as a substitute (if necessary). When choosing "paid leave", there is an option to choose whether to be a standard vacation or other type of paid annual leave. You can also input details and select colleagues to notify. In order to finalize the request click on the "Submit" button. That is it. Your request is on it way.
Settings
The Settings menu sets the entire workflow for the organization. In it you can find several tabs with the relevant settings: General, Access, Processes, Settings, Holidays, Notifications, Templates, Organizations, Security, License, Branding. Most of the settings have the option of activating / deactivating by ticking the corresponding checkbox. When the checkbox is empty, it means that the functionality is not active. On the other hand, if the checkbox is marked with a tick, that means it is activated. After each correction, you have to click on the  button, located in the lower right corner of the screen. The
  button, located next to it, allows you to return to the home screen of the calendar.
General
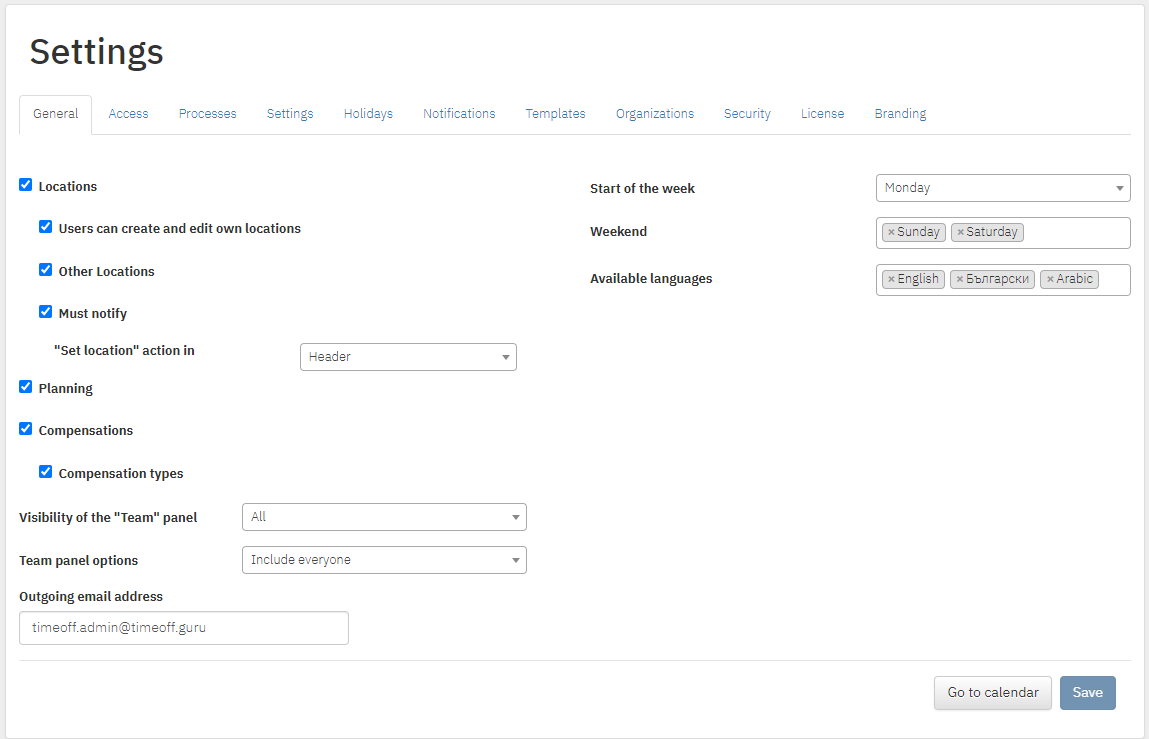
- Locations: The first thing you can see in the General Settings is the ‘Locations’ checkbox. After clicking on the checkbox you can adjust additional settings about them. Should users be able to create and edit own locations or not; whether locations, other than the available ones, can be added by users or not; should there be an obligatory notification to the direct manager when an employee is changing their location and where the
 button should be located - in the header above the calendar or in the main user menu.
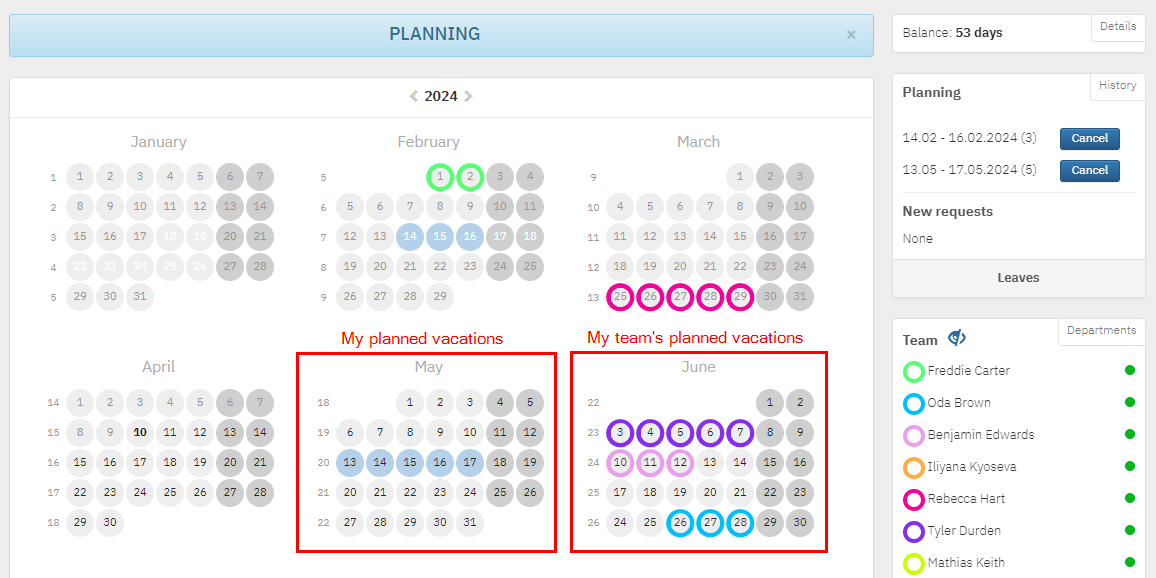
 - Planning: The purpose of this functionality is to achieve a better perspective of the future absences in your team before they have been requested. This way the system provides even higher levels of traceability and transparency and aids the management of absences in larger teams and/or busier periods throughout the year. After checking the Planning option, you will see a "Planning" button on the main screen. After you click on it, a new view of the main calendar opens, which presents the planned absences of people from your team.
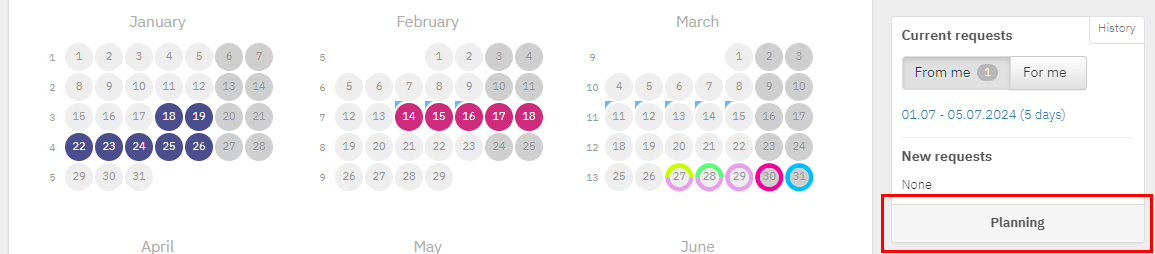
When a calendar date is filled with colour, this indicates that those planned time off periods are yours. On the other hand, if the circles are not filled – those are the absences of all colleagues that you have added to your team. If you want to leave Planning mode, simply click on the X button or on the button 'Leaves'.
- Compensations: When checking Compensation, you will have the option to add additional employee bonus days. In case you use different types of bonus days in your organization, you can check Compensation types, thus you will keep track of the remaining balance of the different types.
- Visibility of the "Team" panel: With this dropdown menu you can determine who can see the Team section – managers, managers and additional approvers or everyone in the organization.
- Team panel options: This dropdown menu allows you to choose which employees can be added to your Team panel.
- Outgoing email address: The email address entered is the address from which all notifications will be sent. If a user replies to a notification sent to them, the reply will be returned to the same email address. You can enter an email address that is associated with the specific organization + admin@timeoff.guru. Example: company.admin@timeoff.guru.
- Start of the week: Provides the option to determine which the first working day of the week should be - Monday or Sunday.
- Weekend: With this setting you can determine the non-working days throughout the week.
- Available languages: The system has 12 languages. Languages refer only to custom calendars, not the menus Settings, Reports, Users.
Access
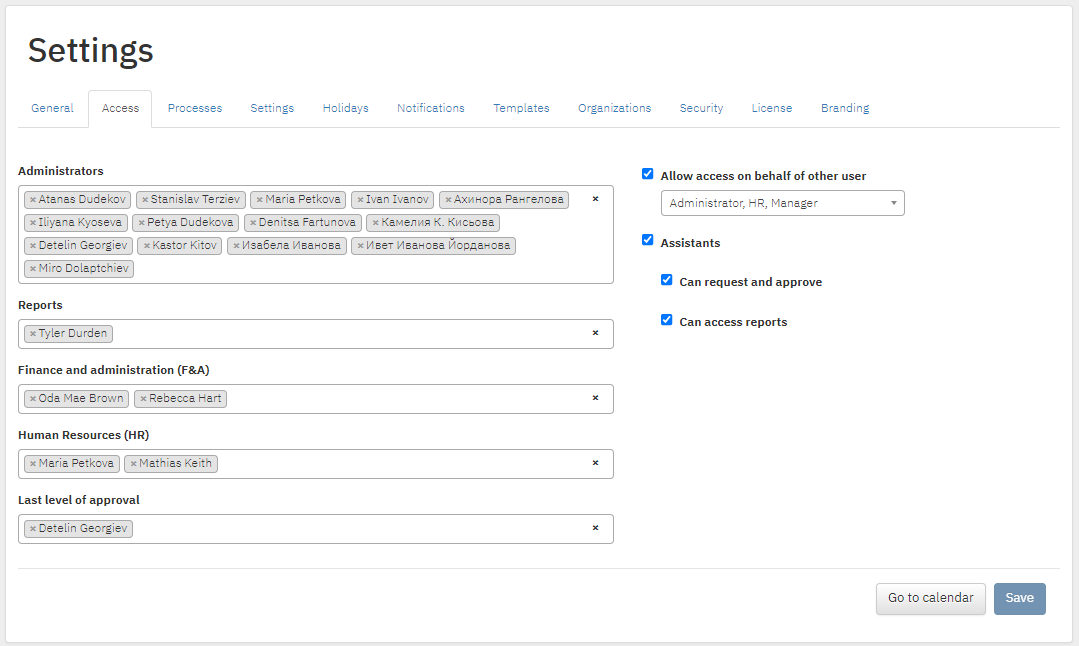
In this menu you can define the access level of users. You can add a user by entering the name in a specific field, and remove it from the X button in front of the name. Each role has the corresponding meaning:
- Administrators: The users who are administrators have access to everything in the system (Reports, Settings, Users, Works on behalf of other user, the ability to add and remove users from each role);
- Reports and Finance and Administration: Users in these two roles have access to the reports and can edit requests;
- Human Resources: This role has access to the reports and can edit requests. The users in this role have access to the Users menu, can add/deactivate/edit users and can work on behalf of everyone. This is the only role that can view attachments to requested leaves;
- Last level of approval: Similar to Reports and Finance and administration, this role has access to the reports and can edit requests.
Users entered in the Finance and Administration, Human Resources and Last level of approval roles can also participate in the organization approval process.
- Allow access on behalf of other user: From the drop-down menu you can choose which role(s) can work on behalf of other users: Administrator; Administrator and HR; Administrator, HR, Manager. If you have chosen the last option, all users who are direct managers will have the ability to work on behalf of their subordinates.
- Assistants: When this option is enabled you can add assistants in the user profiles. The assistants will have access to the same type of information as the user. Additionally, you can choose whether the assistants can request and approve when working on behalf the user and whether they can access reports.
Processes
Settings
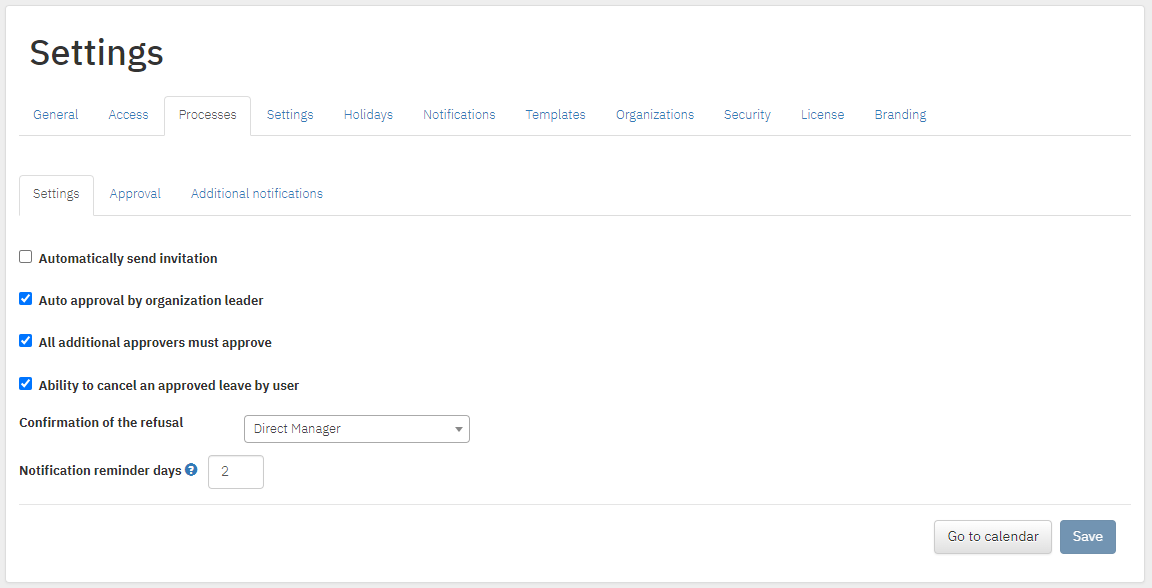
- Automatically send invitation: If this option is enabled, when adding a new user you will see checkbox ‘Send invitation on’ where you can select a date on which the system will send an invitation to join the system to the new user.
- Auto approval by organization leader: If this option is enabled and there is a step ‘Organization leader’, performed by users in the role Last level of approval, in the process of approval, the system automatically approves the requests that the organization leader has to approve.
- All additional approvers must approve: If this option is enabled, there is a step ‘Additional approver’ in the process of approval and there are multiple additional approvers in user profiles, all of the additional approvers need to approve the leave request. If the option is not enabled it will be enough for only one of them to approve the request so that it can go to the next approval step.
- Ability to cancel an approved leave by user: If this option is enabled all users can cancel their leave requests and input a reason for the cancellation. If an employee has requested annual paid leave, for example from Monday to Friday, but cancels it on Wednesday, the system will only display the absence from Monday to Wednesday. From the drop-down menu in Confirmation of the refusal you can choose who must approve/reject the cancellation of the leave requests – Human Resources, Direct Manager, Organization Leader, Finance & Administration, Additional approver or no one.
- Notification reminder days: With this setting you can set how many days prior to an absence the system should send a reminder email to notify users of the leave requests that are waiting for their approval.
Approval
This menu adjusts the approval process of each submitted request. Additional steps can be added from the  button. For each approval step, there is a check box for which role to receive notifications and when. In this case, for example, when an employee requests a leave, they will receive a notification when their request is registered in the system. After being approved by their direct manager, the request goes to Human Resources for approval. Once Human Resources approves the leave request, the requester, their direct manager and Finance and Administration will receive a notification.

Abbreviations are as follows:
- Requested by – Requestor of the leave
- Substitute – Vacation replacement of the requestor
- AO – Additional approver
- F&A – Finance and administration
- HR – Human Resources
- DM – Direct manager
Additional notifications
In additional notifications, you can specify who and when to receive notifications for sick leave request, sick leave rejection from employee, canceled request from employee, leave request (if no approval process is set up) and notification when uploading a file to an already requested leave.
Settings
Settings
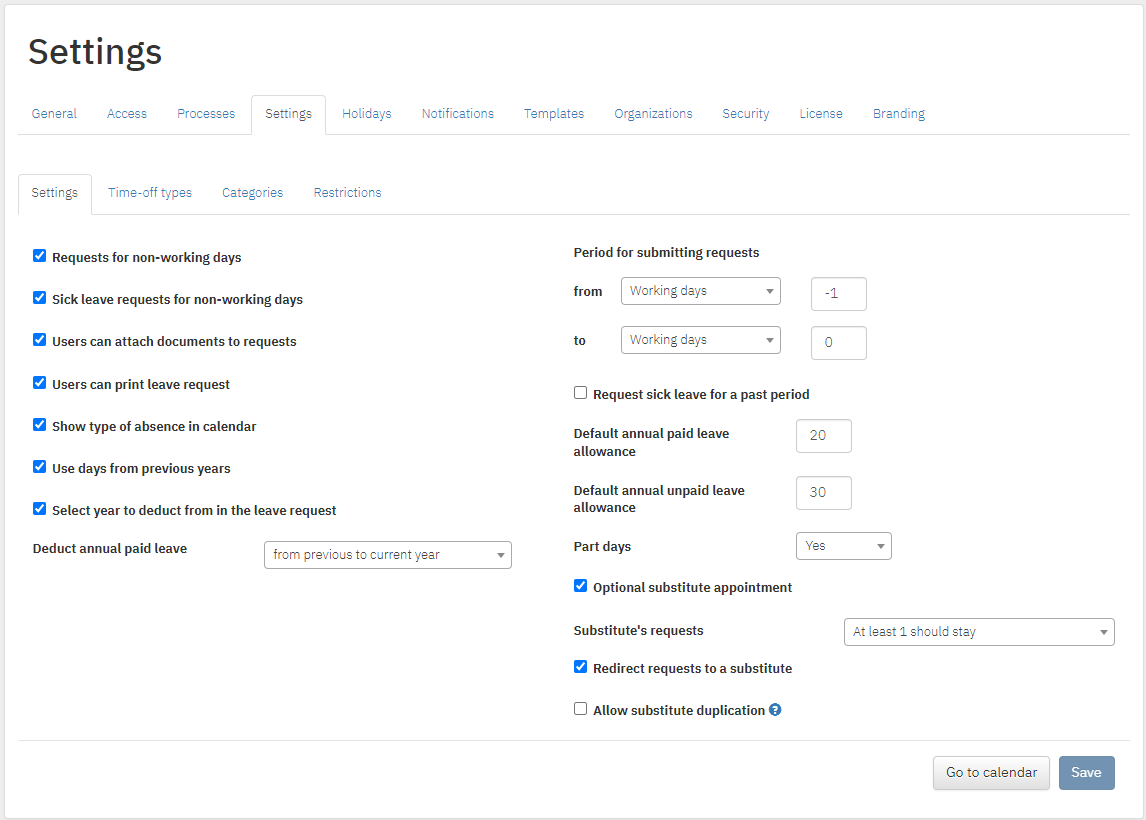
- Requests for non-working days: This option allows users to request leaves for the days marked as weekend days and holidays.
- Sick leave requests for non-working days: This option allows users to request sick leave for the days marked as weekend days and holidays.
- Users can attach documents to requests: This option provides the ability for each user to attach a file to a request they have already submitted. This option is only possible if in the settings for the corresponding type of absence it is indicated that a file can be attached. Attachment is possible for both current requests and past requests from the History menu.
- Users can print leave request: When the option is active, users can print their leave request forms from the ‘Current requests’ section via the
 button and can print their leave request orders for completed requests in ‘History’ section via the
  button.
 - Show type of absence in calendar: When hovering the mouse over a particular day on the calendar, the system allows each user to see what type of leave their colleagues have requested.
- Use days from previous years: If this option is enabled, users will have the ability to request days from previous years if they have unused ones.
- Select year to deduct from in the leave request: By enabling 'Use days from previous years' the option will automatically be activated for users to select which year to deduct the requested days from when requesting a leave. For this purpose, it is necessary to enter the number of days desired and to choose the year from which they are deducted.
- Deduct annual paid leave: There are two options for deducting leave. The first one is as follows: days are deducted, starting from previous years to the current one. In this case when a user requests paid leave, the system takes days from the most distant year in which they has days available. The second option is deducting days from the current to previous year - after the days of the current year are over, days from previous years are deducted.
- Period for submitting requests: This option allows you to set a restriction back or forward in time where users are entitled to make leave requests. It is possible to choose whether the specified period is in calendar or working days. If the number is 0, there are no limitations and the entire calendar remains unlocked.
- Request sick leave for a past period: This option allows users to request sick leaves for a past period regardless of the number of days that are put in ‘Period for submitting requests’.
- Default annual paid leave allowance, Default annual unpaid leave allowance: The days entered in these fields apply to all users in the organization. These are the days that are automatically loaded every year into users' calendars.
- Part days: This option gives the possibility to set whether the different types of leaves in the system can be requested for part days.
- Optional substitute appointment: Allows the submission of a leave request that may not specify a particular vacation replacement. In the case that this option is not switched on, in the users’ profiles there are three options: mandatory (only predefined users can substitute), allow other (indicating a substitute is obligatory, however there are no limitations when choosing one) and no replacement. If the setting is switched on, in the users’ profiles only the first two options would remain.
- Substitute's requests: With this setting you can regulate how the system works in the cases when a user, who has been indicated as a substitute, wants to request a leave. The options are: Allow for all, At least 1 should stay and Prohibited.
- Redirect requests to a substitute: With this checkbox you can determine the outcome of the following situation: when a manager (or any other user) is included in the approval process, but is absent and has indicated another colleague as a substitute, should the time off request wait for the manager to come back from their vacation to approve it or should it be redirected to their vacation replacement.
- Allow substitute duplication: This option allows one user to be designated as a substitute for multiple profiles at the same time.
Time-off types
This menu introduces all types of absences in the system. At the far right for each type of leave there are three icons that have the following meaning:
 - With this option you can change the sequence of absence types by moving up or down the list respectively.
 - Allows you to edit the absence type.
 - Allows you to delete the absence type.
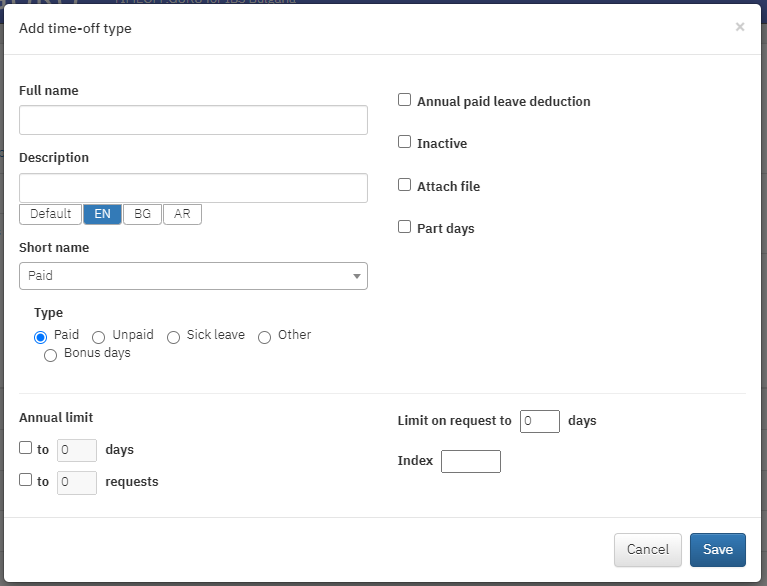
You can add new time-off type by clicking  button. In the window that opens, you have to fill in the fields Full name, Description, Short name (this is a drop-down menu with the available time-off categories) and Type. You can also determine whether this leave type deducts from the users’ annual paid/unpaid leave, set annual limit etc. In case the specific type of leave is not used by the organization, you can select the inactive option. After all adjustments have been completed, need to save all changes from the button.
Accruals
Accrual rules allow users not to receive the full number of days of paid annual leave at the beginning of the year, but to accumulate over a certain period. In case you want to use this option, please contact your account manager.
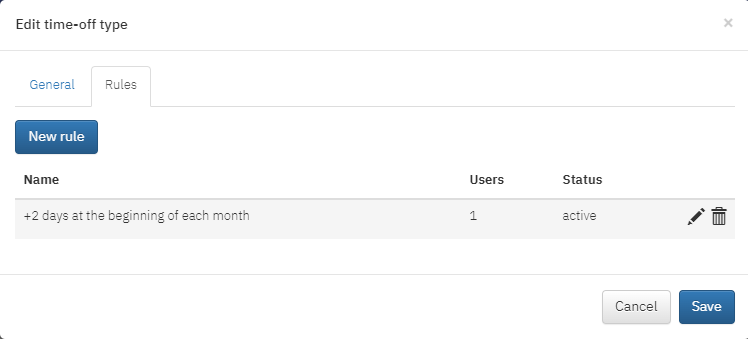
You can create new rules by checking the ‘Accrual Rules’ checkbox when adding/editing a time-off type. After that you will see a new tab available – Rules, where you can see the names of the already created rules, how many users does they appy for and whether they are active or not. On the right side of each rule, there are buttons for editing and deleting it.
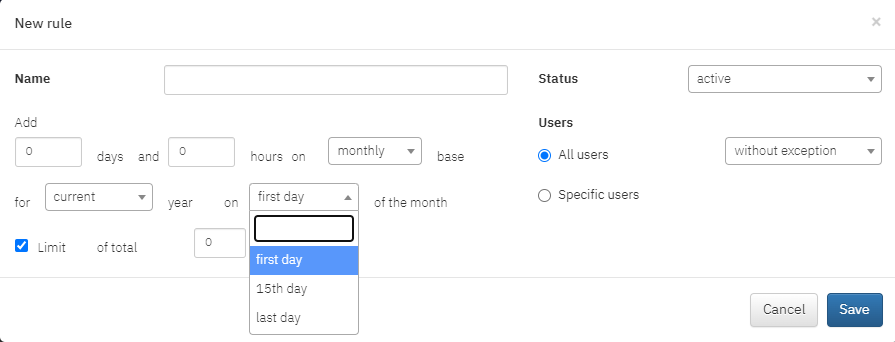
After clicking on the  button a new window is opened, where you can set up the parameters of the rule. Here you can type in the name of the rule, the number of days to be accrued on a daily/weekly/monthly/yearly basis; you can choose if this rule should correspond to the current or the next year and if it should be activated on the first day/in the middle or in the end of the month. With the checkbox Limit you can enter a regulatory number, which when reached ends the accrual. On the right side of the window you can change the status of the rule to active or deactivated and if it should be applicable for all employees or specific users only. Finally, you can save you changes by clicking on the Save button.
Categories
In tab Categories you can manage the categories of the time-off types in the system. Similar to the Time-off types menu, you can edit, delete and change the sequence of the categories. The colours of the categories can be changed by clicking on the Color circle. The  button allows you to add a new category in the system and determine it’s name, index in monthly report, whether it should be included in the monthly report and whether it should be active or not. After all adjustments have been completed, need to save all changes from the button .
Restrictions
Restrictions serve to block specific days during which employees cannot submit leave request. Adding a new restriction can be done from the  button and entering the relevant information - Name of the restriction, for example, Transmission of a public contract; the period in which you want to limit the users and whether the restriction is applicable to the whole organization or specific users only.
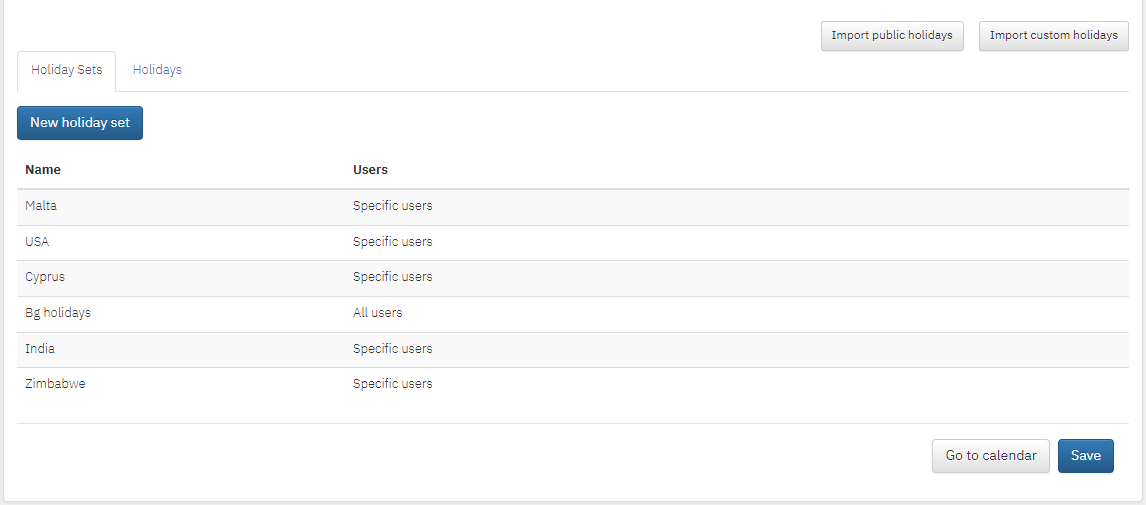
Holidays
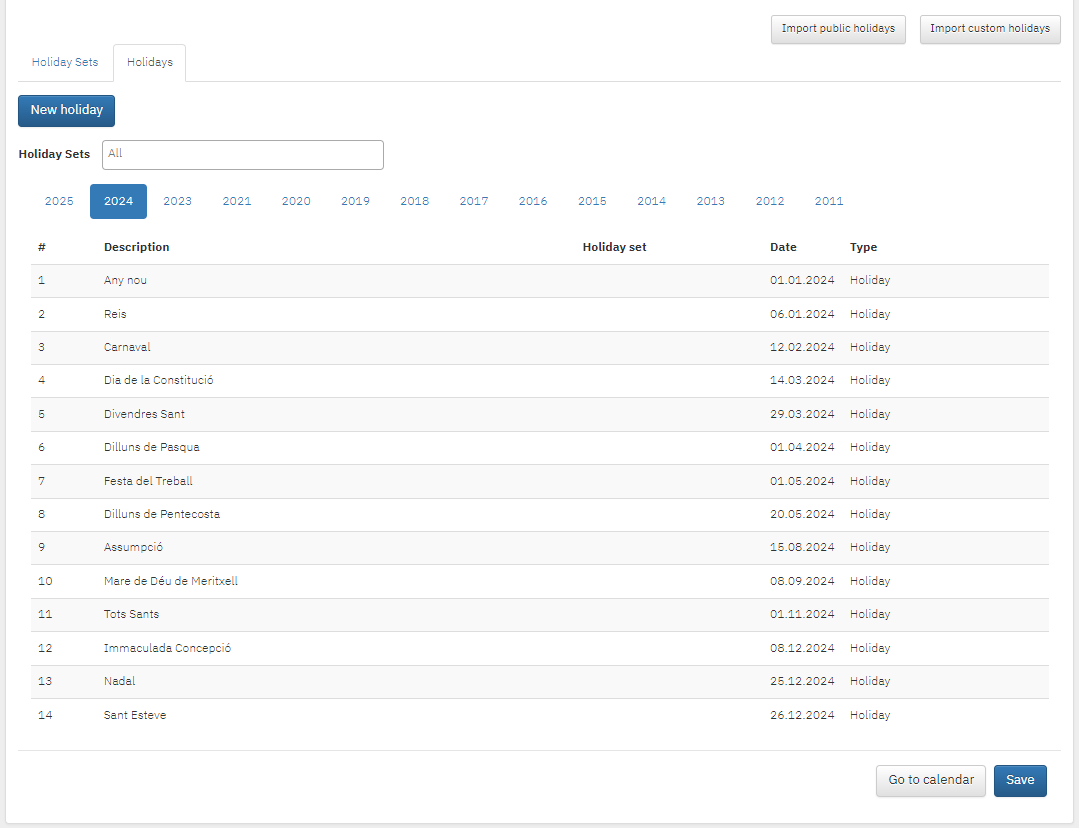
In the Holidays menu are entered all official holidays for all years. If you want to enter new holiday, this can be done by clicking the  button and: choosing the type of day – non-working day, holiday or working day; selecting the date from the calendar; entering a descriction and clicking the Save button. There are 2 options for importing holidays into the system:
- Import public holidays: With this option you have to select the country whose holidays you want to import, the language in which to display the holidays in the calendar, the year and the holiday set*.
- Import custom holidays: With this option you can import your custom holidays via Excel file. The information you need to enter is the same as for the import public holidays option.
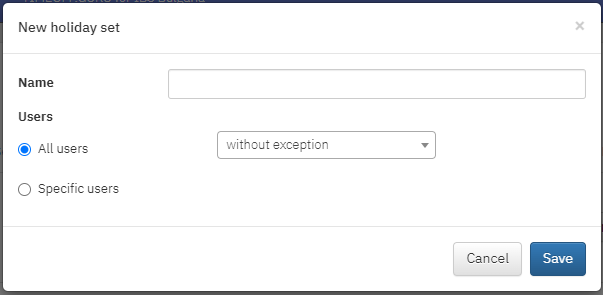
*If there are employees in the organization whose holidays differ (for example, if they are in different countries), you have the option to create holiday sets. To activate this option you must contact your account manager. Firstly, you will need to create a new holiday set by clicking on the  button. In the new window that pops up there is a field for the name of the holiday set and which users should be associated with it. There are two options: the holiday set is applied to everybody or only specific users. Afterwards holiday sets can be edited or deleted via the buttons, located on the right side of the particular row.
Notifications
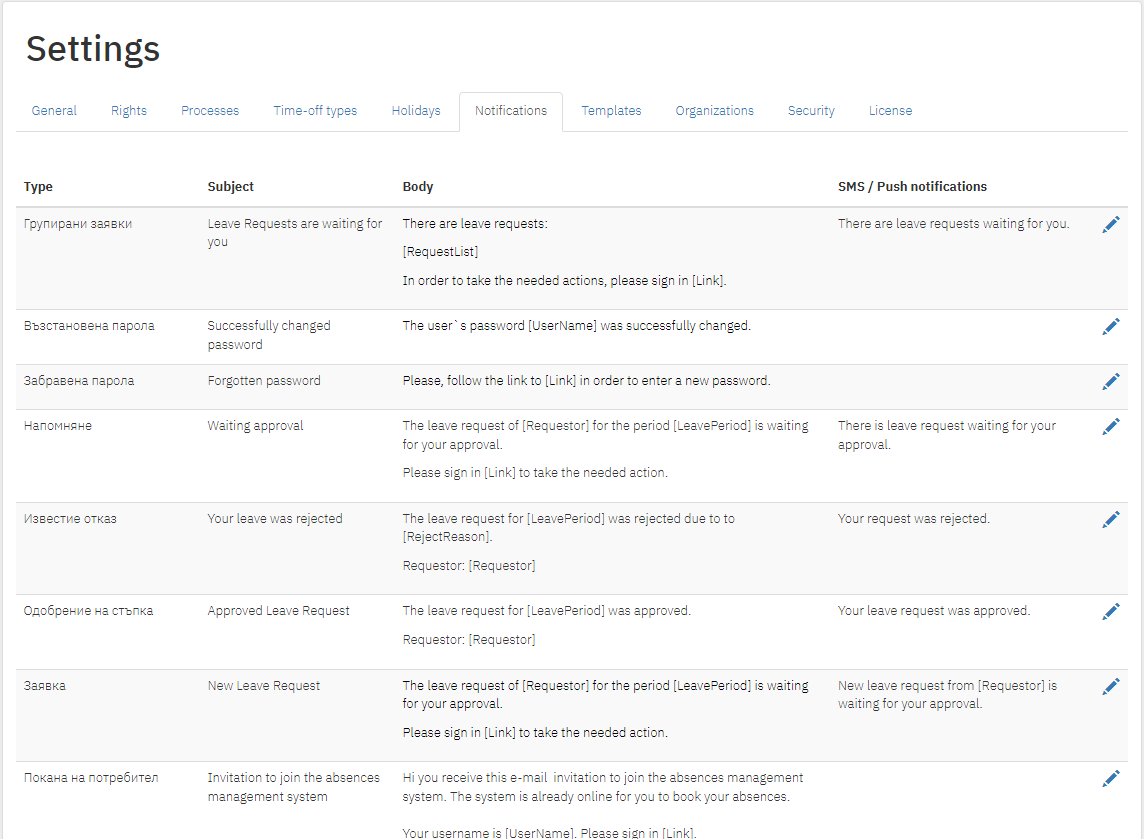
In the notifications menu are all the notifications that are sent by the system. In the type field, it is described in which action the corresponding notification is sent (for example, upon approval of a request, cancellation of sick leave request, etc.). With the button located at the far right you can edit each notification.
The notification options are two:
- Email: With this option, the system picks up the email address that is entered into user’s profile and sends the relevant notification.
- SMS / Push notifications: With this option, notifications are sent to user’s TIMEOFF.GURU mobile application.
The information in brackets (for example [Requestor], [LeavePeriod], [LeaveType]) is automatically replaced by the information in the request, so it is important not to edit or delete it.
Templates
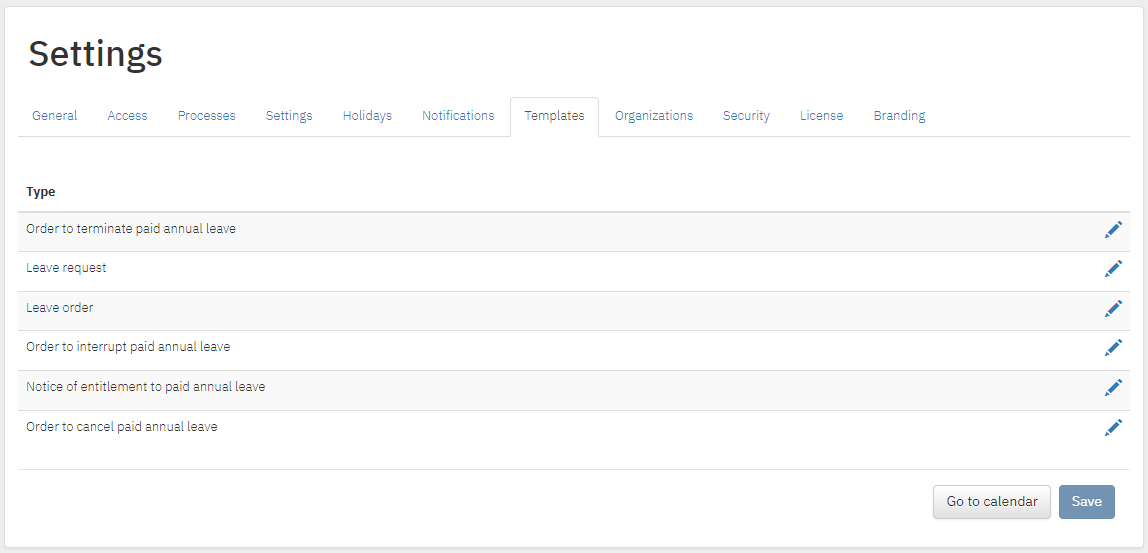
Via this menu you can regulate the templates of documents for Leave request, Leave order, Notice of entitlement to paid annual leave etc. Each template can be edited using the pencil button at the far right. As with notifications, it is important not to edit or delete the information in brackets as it is automatically replaced by the information in the leave request.
Organizations

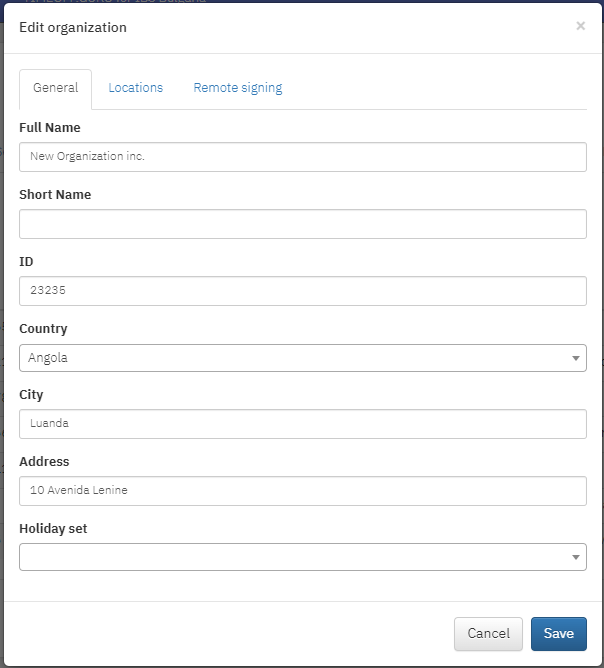
The Organizations menu provides information about the organizations that use the system. A new organization can be added from the  button. After clicking this button a new window appears where you can enter data for the organization.
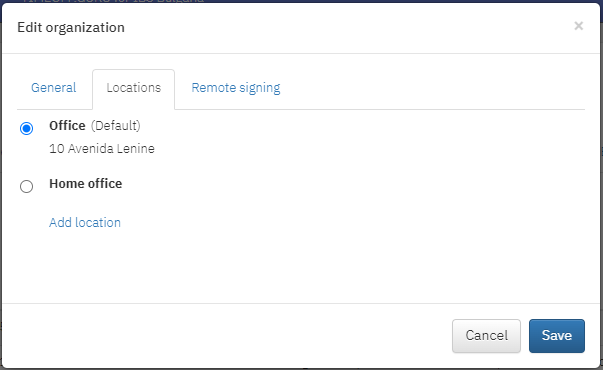
The following tab Locations appears if the locations are activated from the General Settings. With the button you can edit a current location. The upper field is for the name of the location and the one beneath is for the address. Afterwards you can save the location by clicking on the tick or if you want to cancel you can select the button X. By clicking on the button you can delete a previously created location. With the radio button, located on the left of the location name you can choose a default location for the whole organization. If you want to create a new location, click on  and following the editing instructions from above, enter a location name.
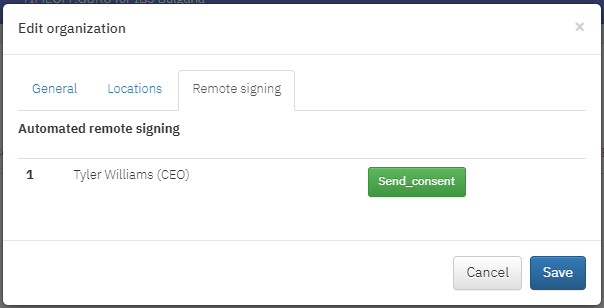
The last tab when editing/adding an organization is the Remote signing tab in which you can manage the signing of leave orders in the system. This is a function implemented with our partners Borika, through which leave orders can be automatically signed by the manager of the organization or a person authorized by them. For more information, please contact your account manager.
Security
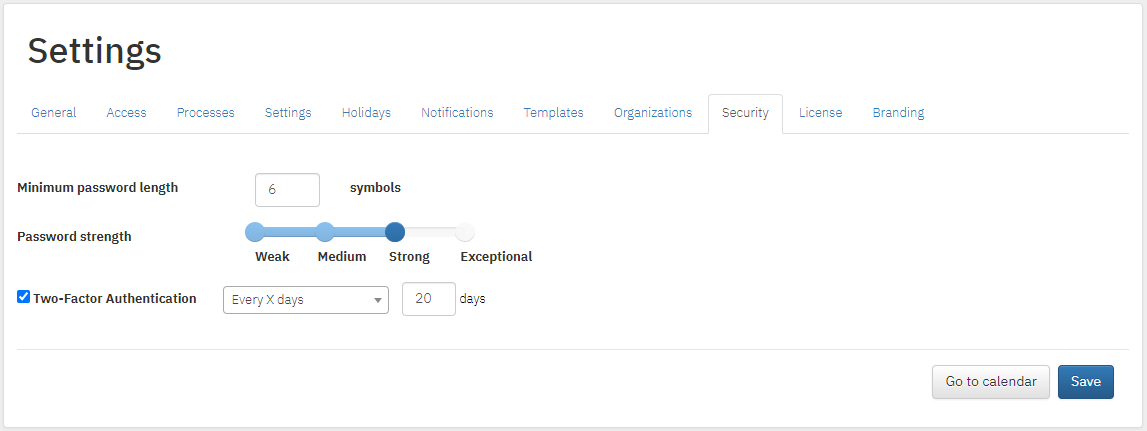
TIMEOFF.GURU allows setting a password requirements. There are two criteria for determining what the password should be:
- Minimum password length – setting the minimum number of characters for the password.
- Password strength – setting how strong the password should be:
- Weak – without restrictions;
- Medium - must include letters and numbers;
- Strong - must include numbers, uppercase and lowercase letters;
- Exclusive - must include special characters, numbers, uppercase and lowercase letters.
You can also enable a two-factor authentication and select it’s frequency. The system requires the user to enter a secret code generated by the system and emailed to the them.
License
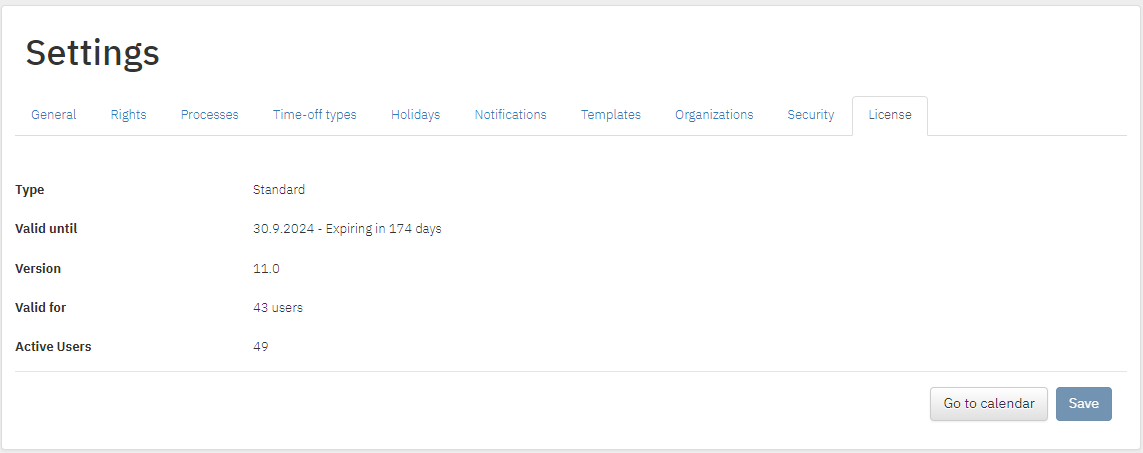
In the License tab you can see the type of your license (trial, free or standard), the date of validity, which version the system is, how many users the license is valid for and how many active users there are in the system.
Branding
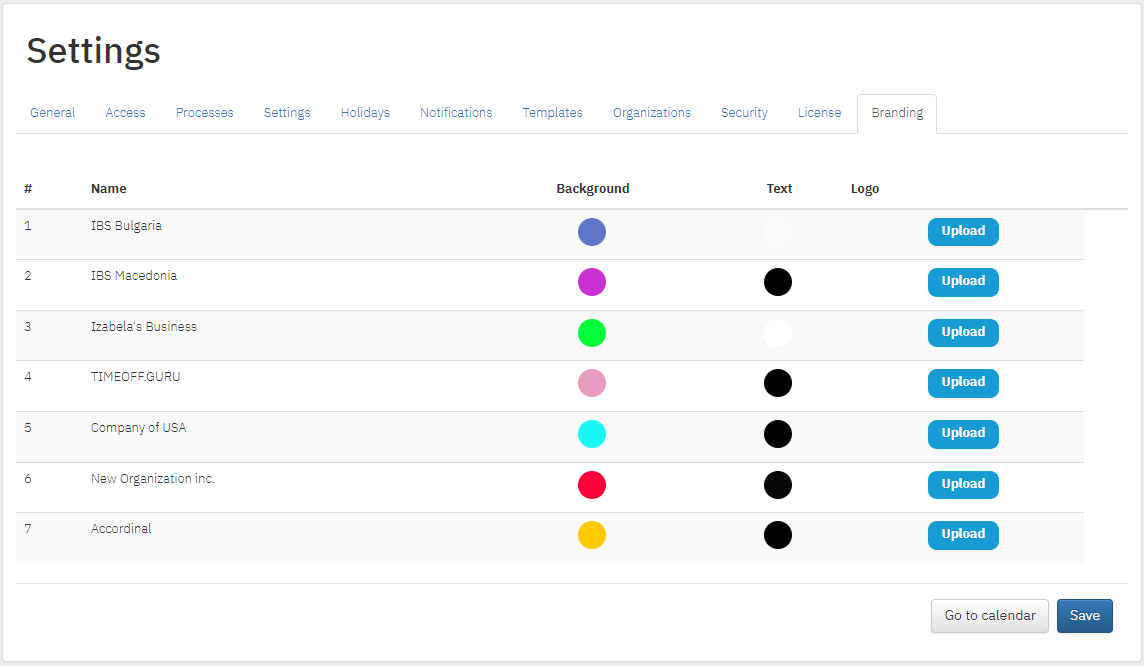
In the Branding menu you can manage the branding of the organizations in the system. This includes the color of the header background), the color of the text in the header and the organizations logo.
Users
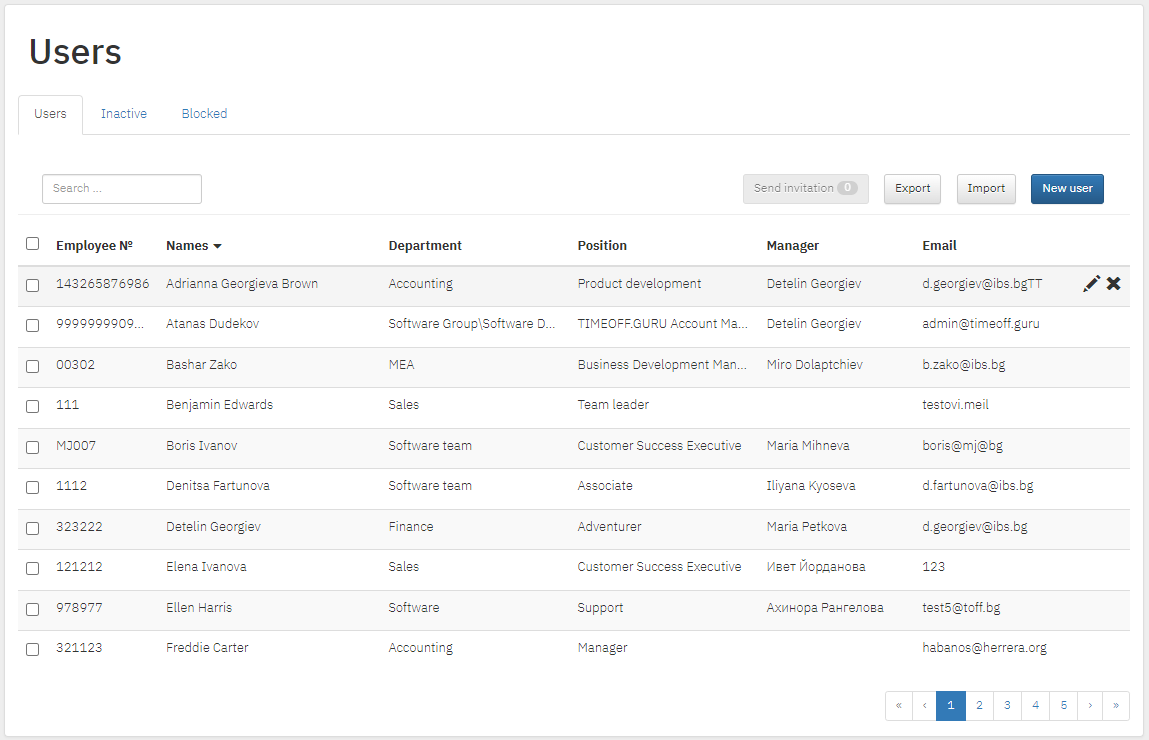
In the users menu is stored all the information about the active, inactive and blocked users in the system. From here you can perform the following operations:
- Create an account;
- Send an invitation to join the system;
- Export / import users;
- Edit a profile;
- Deactivate a user;
- Unblock a user.
At the far end of every user’s row there are 2 options:
- - Allows you to edit the user’s information.
 - Allows you to deactivate the user. In order to do that, first you must fill the Last working day field in the user’s profile. After deactivating a user, they will no longer have access to the system.
Creating a new user
You can create an account in two ways - by choosing the  button or by importing all users using an MS Excel template by clicking the
  button. When you click on the New user button, a new window where you need to fill the relevant information will open.
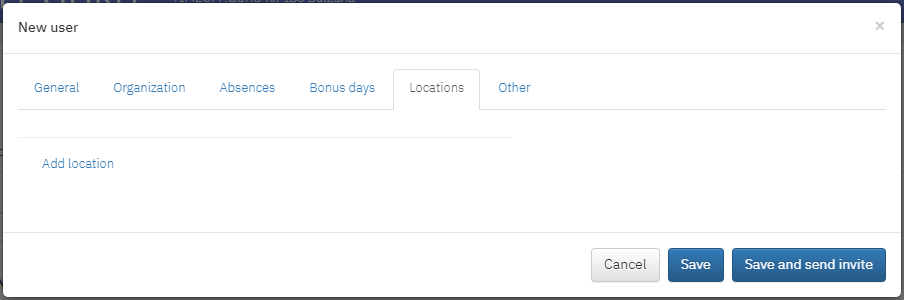
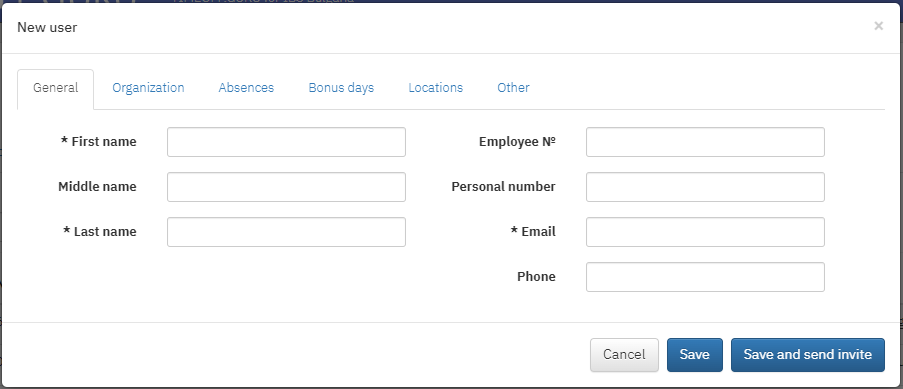
- In the General tab, the required fields with a * sign must be filled, as well as Employee № or Personal number.
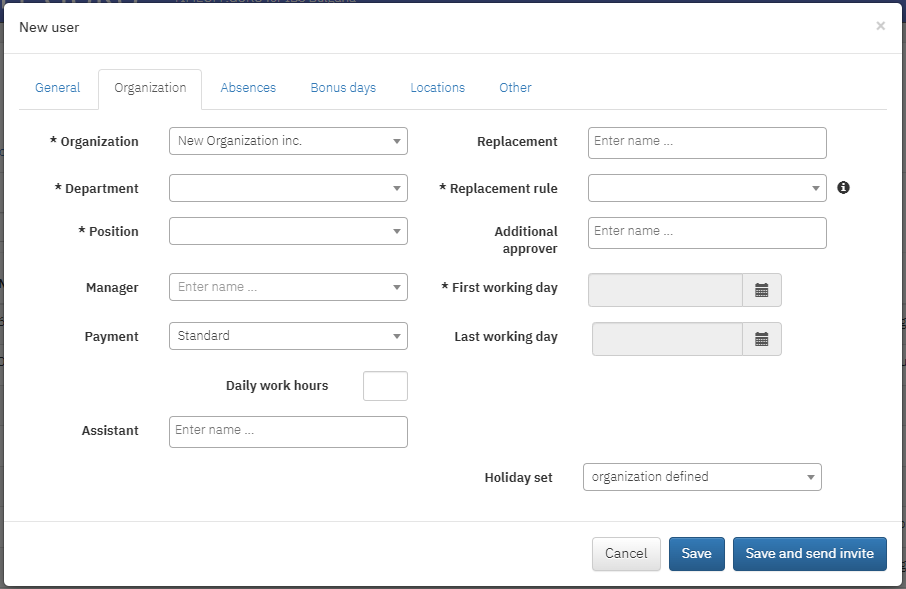
- Similar to the General tab, in the Organization tab the required fields with a * sign must be filled, as well as the fields Payment and Daily work hours, because they are used to generate the correct monthly report. The options for Replacement rule are shown when you click on the
 .
.
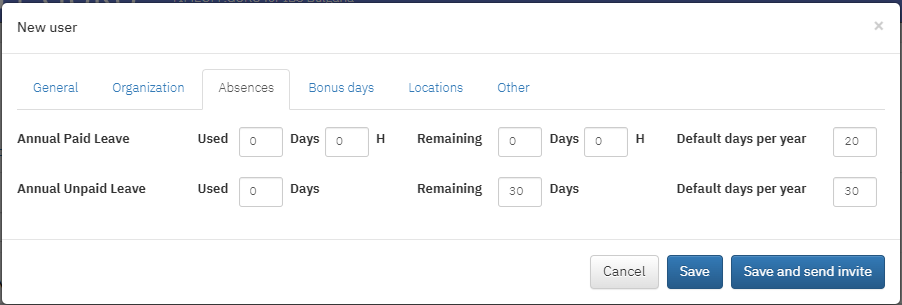
- In tab Absences you must enter the default paid/unpaid leave days, as well as the remaining ones.
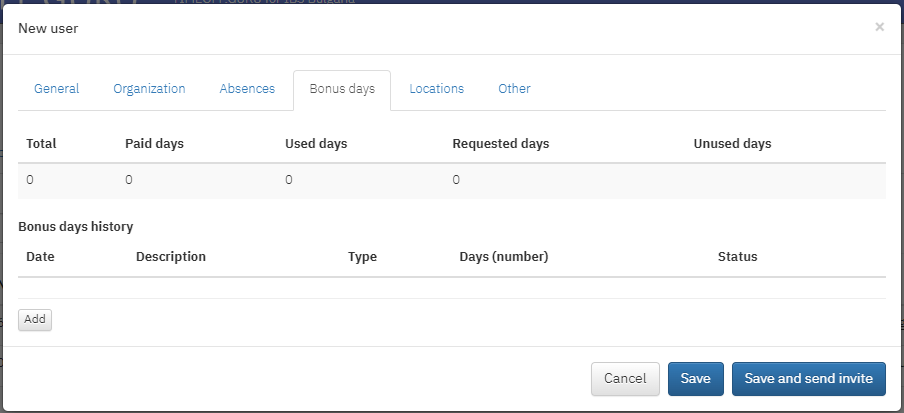
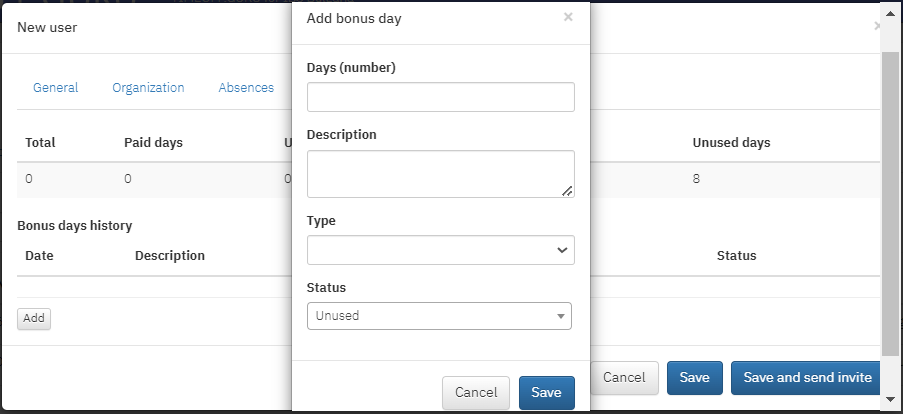
- In Bonus days tab you can add an unlimited number of bonus days (compensations). The process is as follows: click on the add button, fill in the required information and save your changes. This tab is available only if you have already checked the Compensations checkbox in the General Settings of the system.
- From tab Locations you can add locations for the particular user.
- In tab Other you can set the user’s mode of approval (enables the user to be notified of every leave request that is pending their approval or to group all leave requests and send them to the user for approval within a specified time), notifications (by email, push notifications in the mobile applications or all) and their alternative name.

After entering the required information you can either click on and invite the user later or you can click on  and invite them to join the system now.
Import
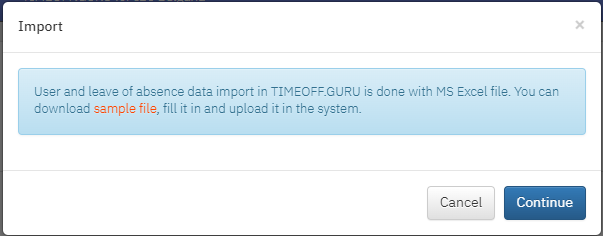
The second option is by importing multiple users at once. After clicking on the button, you must download the sample file and fill it. Please note that the first row in the sample Excel file is filled with example information to guide you. When filling the cells, keep in minds the format of the cells in order to do a successful import (most of the cells should be in Text format, First working day should be in Date format, Phone should be in Number format, etc.). Once you have entered the information in the MS Excel file, you must click on  button, choose the particular file and click on Open. The system will notify you if there is an issue with the file or if not, that N number of employees have been added to the system.
A video tutorial can be found HERE.
Sending access invitation
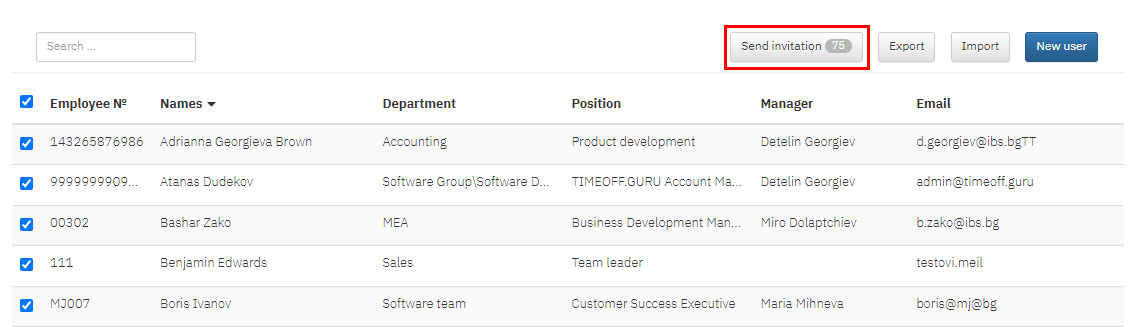
Sending an invitation to join the system is possible when users' profiles are filled with the required information. Invitations can be sent to multiple users simultaneously or one user at a time. In front of each user there is an empty checkbox, which when selected activates the Send invitation button. Тhe checkbox at the top, next to Employee №, marks all available users at once. After clicking on the Send invitation button, each user will receive an invitation at their email address and will have to open the it and set their password within 24 hours.
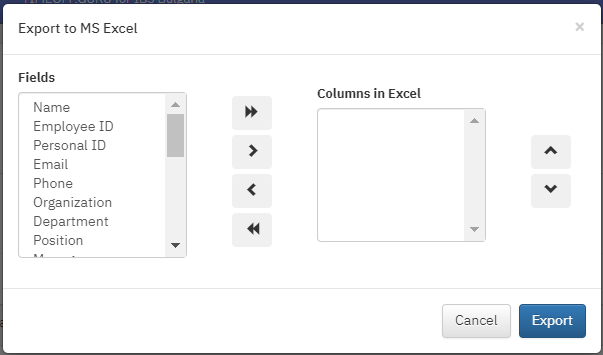
Export
When clicking on the  button, another window appears in which you can select the information you want to be exported to an Excel file.
Inactive users
You can find all inactive users in tab Inactive, where you can see the users’ information when you click on  or you can activate them via
  .
.

Blocked users
In the Blocked section you can find all the users who have been blocked after attempting to log in to the system but were unsuccessful after a certain number of attempts. An administrator of the system can unblock users.
Reports
The reports give a complete view of all leave request in the system. There is an opportunity to generate a report based on the status or type of the absence, get a better view of your employees’ sick leaves and unpaid leaves. In the detailed report the filtered data can be exported to Excel.
General
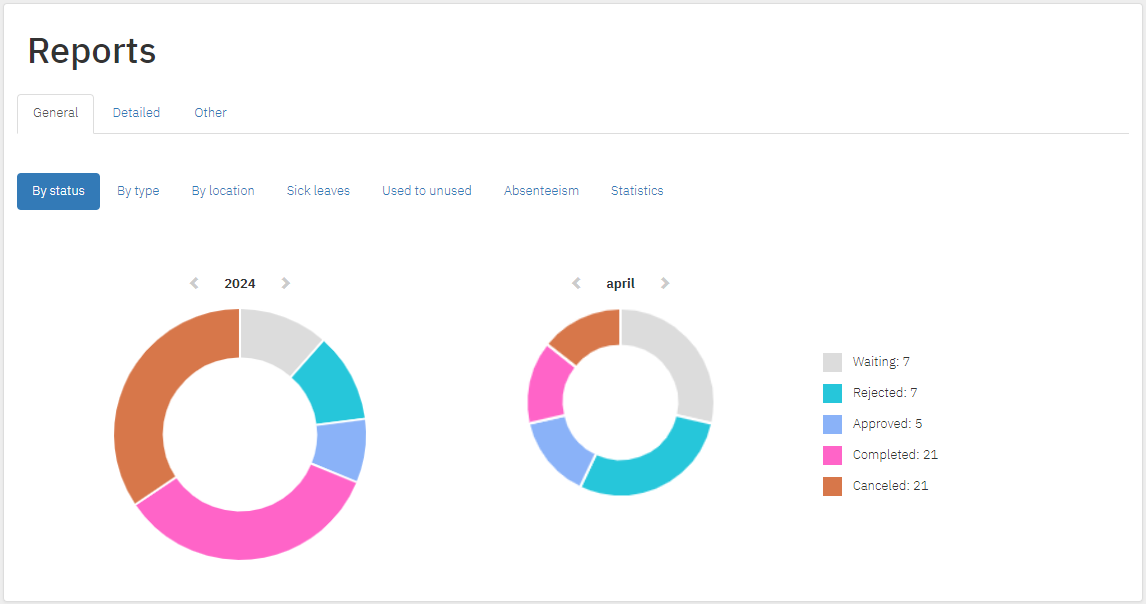
In tab General you can view reports by:
- Status: By hovering the mouse over the circle diagram, the system calculates what percentage of all requests are waiting, rejected, approved, or completed. Afterwards you can click on a particular section of the circle diagram and this would transfer you to Detailed report. For example, if you click on all completed absences during July, the system will display in details all leaves with this status. In the Detailed report you can alter all filters to fit your need.
- Type: This report shows what are the types of the leave requests in the system for a particular month or year. Similar to the ‘By status’ report, after you click on a particular section of the circle diagram, the system will transfer you to Detailed report.
- Location: You can view the different locations and how many users work from there for a particular date. You can export daily, monthly or a specific period report.
- Sick leaves: This report gives you an overview of which months typically have the most sick leave requests.
- Used to unused: From here you can track the differences in numbers of used to unused leaves over the years.
- Absenteeism: The report calculates how many absences there are which are different than annual paid leave. You have the option to choose which year to see the values for. By default, the current and previous year are visible.
- Statistics: In this section you can monitor the average time for approval of requests in the organization, the variable number of users in the system in different time periods and the average number of requests per user.
Detailed

Detailed report provides detailed information for every leave request. You can filter results based on leave/request period, requestor, organization, type of absence, etc. Each request has an option to be edited and printed. When searching for a specific request, it is necessary to fill in the required fields. Search starts with the Search button. After the system completes the search, several options appear next to the Search button:
- Other: Via this button you can regulate which columns are presented in the detailed report. Other options are to download all attachments in the requests you have previously selected and also download all signed XML/PDF files. The last option is only available if you are using a qualified electronic signature (QES) to sign your leave requests, hence avoiding the usage of paper in the overall process of leave management.
- Change status: By clicking on this button you can change the status of the selected absences.
- Print: By clicking on the button you can print a certain number of documents and there are four options: all leave orders, all leave requests, all selected leave orders and all selected leave requests. You can select a leave by ticking the checkbox on the right side of every request.
- Export to Excel: A report is generated directly in Excel, and it is possible to choose different columns to visualize. After selecting what information the report should contain, select the Export button.
- View All - information is exported for the entire period backwards. Then you can choose what information the report should contain and select the Export button.
- View By Months - Selecting this option enables you to choose which month you wish to generate the report for. If there are requests from the end of one month and continue throughout the next, the report will separate them.
- Import: Allows importing leave requests into the system, which is performed via a file in MS Excel format. In order to import leaves it is necessary to download and complete the attachment. It is important to enter all required red fields in order to be able to import the information.
 - Provides a detailed overview of the specific request. When reviewing a request, you see the full information as well as the step of approval that has been reached.
 - - Allows you to edit the request. When editing a leave request, there is an opportunity to adjust the period and type of leave. Important part of editing a request is to change the period first, then the number of days that have been used. In case it is necessary, you change the type of leave / paid, unpaid, sick. Once the corrections have been completed, save your changes by clicking on the Save button.
 - This option allows choosing between several types of documents to edit or to print directly: Edit leave order, edit leave request, edit leave cancellation order, print leave order, Print leave request.
 - Indicates that a document has been attached to the request.
Each request can be reviewed, edited, or printed. The options are located at the far right of the request:

Other
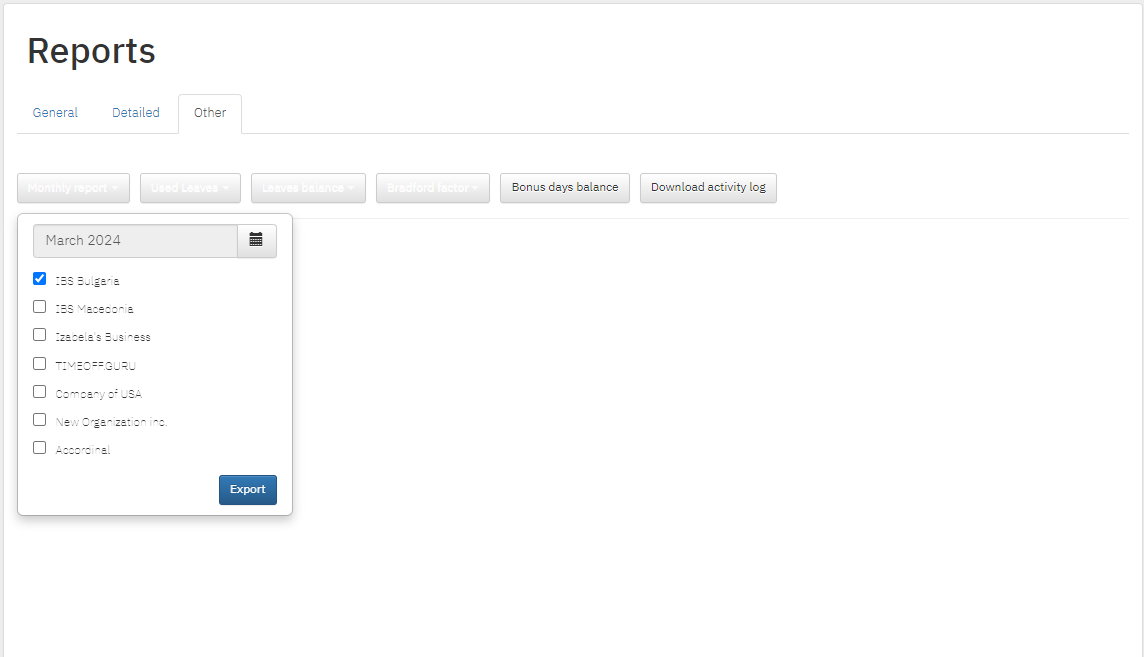
Tab Other consists of:
- Monthly report (Form 76): This type of report allows you to get an overview of all the hours worked for the particular month. The report can be exported in MS Excel after choosing a particular month and an organization, in the case that there is more than one.
- Used leaves: Allows you to generate a report of the number of days used for each type of leave for a specific time period and organization. By clicking on the Used Leaves button a calendar will be displayed so you can choose the date. If there is more than one organization in the platform, you must also select which organization to generate it for. This report includes all types of absences that are entered, whether active or not. Under each type of absence for each user, the system calculates the number of days that have been used.
- Leave balance: Allows a detailed overview of the current balance of leave in the organization. When selecting a specific date from the calendar, it means that the report will be formed based on the date you have selected.
- Bradford factor: The Bradford factor is a concept extracted from human resource management theory, which states that overall, it is much better for the sustainability of the work atmosphere if employees are to be absent less often but for longer periods that more often but for shorter periods. The main argument is that employees need some time to adjust to the work environment prior to and after a holiday, for example. The report assigns certain coefficients to every employee, based on the frequency and duration of their leaves.
- Bonus days balance: This report gives you a summary of the unused, used, paid and requested bonus days/compensations of the users in the system. Similar to the previous reports, if there is more than one organization in the platform you must select which organization to generate it for.
- Download activity log: Allows you to download a detail report of every activity in the system up to now.